SEP 11, 2024
Maximize Your Jupyter Notebook Experience With Determined


March 08, 2022
We’ve talked at length about the multitude of revolutionary single-user tools like TensorFlow and PyTorch, propelling the rise of deep learning. If you are a Deep Learning model developer today, it’s common practice to use a Jupyter Notebook to more easily develop and visualize your code. However, when multiple users across a DL team use Jupyter Notebooks they can experience difficulties collaborating and managing resources. This blog post shows you how to mitigate those difficulties using the Determined open-source deep learning training platform. By the end of this article, you should:
- Be able to maximize your Determined Notebook experience with new conceptual and functional insights such as resource pools, notebook persistence and templates.
- Understand the benefits to teams of users who use Notebook in Determined.
- Have walked through the basic steps needed to install a Determined cluster and create your first Notebook.
Determined enhances the model development experience for Deep Learning teams. Most tools available in the field today 1) lack optimization for Deep Learning use cases and, 2) have limited support for user teams. Determined endeavors to be the preferred solution for Deep Learning developers and teams by filling these model development gaps. This includes providing resource sharing, fault tolerance, cloud provisioning, distributed training, and advanced hyperparameter searching approaches.
Jupyter Notebook is a valuable tool for model developers because it provides an all-in-one solution for developing and executing code, visualizing findings, and sharing insights with other team members. However, when deep learning teams use Jupyter Notebook, JupyterLab, or TensorBoard, whether in the cloud or on-premise, they often experience difficulties provisioning instances for multiple users, maintaining the instances, sharing resources, scaling long-running code, collaborating, and integrating with other tools and services. This article describes how Determined solves those problems, particularly, for Jupyter Notebook users.
Manage Compute Resources for Jupyter Notebooks with Determined Resource Pools
It is common for model developers to use different types of compute resources, whether GPUs or CPUs. While GPUs outperform CPUs in parallel computation, much reinforcement learning work still requires CPUs, and TPUs (which we plan to support in the future) are common options in the TensorFlow world. Within the GPU world, you have a range of processors from inexpensive ones that are less performant to very performant and expensive processors. Managing a project with diverse types of resources and sharing them can be a difficult undertaking. The complexity increases when some jobs on the cluster are stoppable, such as training jobs that have some level of fault tolerance by using periodic checkpointing, while other jobs, like Jupyter Notebooks, are not stoppable.
Determined solves this issue by introducing the concept of resource pools, which abstracts a resource type out of model development. Through configuration, you can choose one of the resource pools defined in your cluster for your Jupyter Notebook. Within each resource pool, resources are shared by all the users on a cluster. Resources are assigned exclusively to each job, which along with containerization makes jobs isolated from each other. Jobs are scheduled based on a configurable policy, which is by default first-come-first-serve.
Another important benefit of using resource pools in the cloud is automatic scaling. Resources are requested from the cloud service provider as needed and scaled down when no longer needed. This reduces cloud expenses for idle virtual machines (VMs).
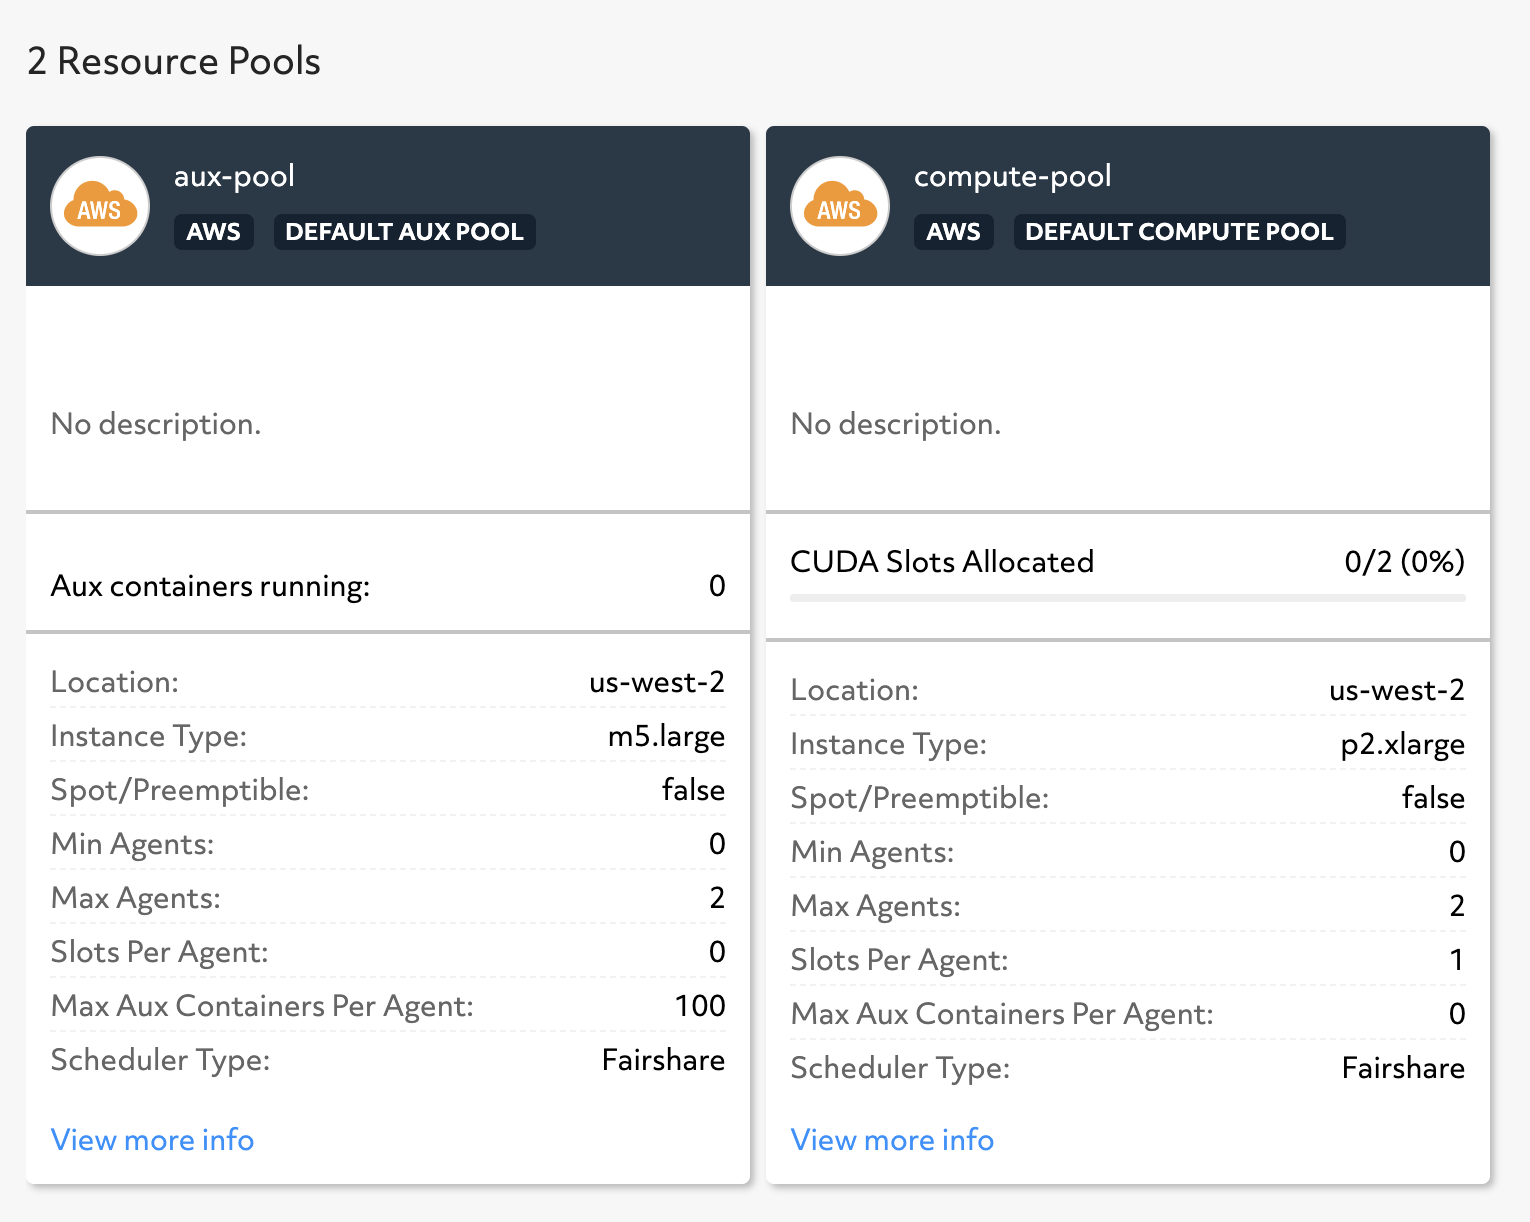 Cluster visualization of two resource pools with different AWS instance types.
Maximize Resources by using Persistence
Forgotten jobs usually hold resources longer than needed causing other jobs to starve for resources. Determined addresses this issue with two features that help maximize resource utilization.
- For training jobs that run in Experiments, Determined automatically releases resources after the job terminates.
- For Jupyter Notebooks and other long-running jobs, Determined releases resources associated with the job by applying a timeout for idle resources.
When compute resources are released, data and files are persisted in long-lasting storage provided the cluster is configured with bind-mounting job containers that have long-lasting storage. This is important because Determined Notebooks are containerized to allow different Notebooks to run in different environments within the same cluster. Typically, a local file system, such as Amazon EFS or Google Filestore, or a network file system is defined for resource pool persistence. If you are using the det deploy deployment tool, persistence is automatically configured, whether your cluster is in the cloud or on-premise. You can confirm this by viewing your Notebook configuration, which should have a bind_mount property for persistence.
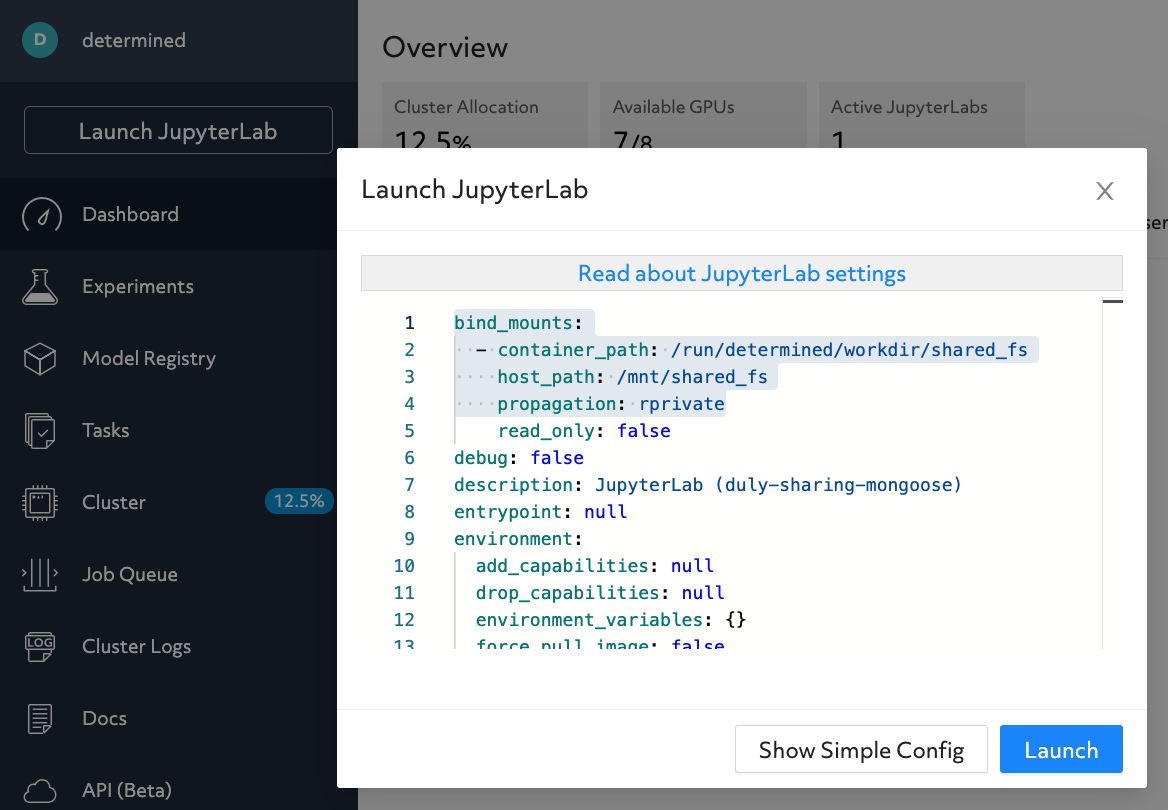 Automatic default configuration mounting host_path into container_path.
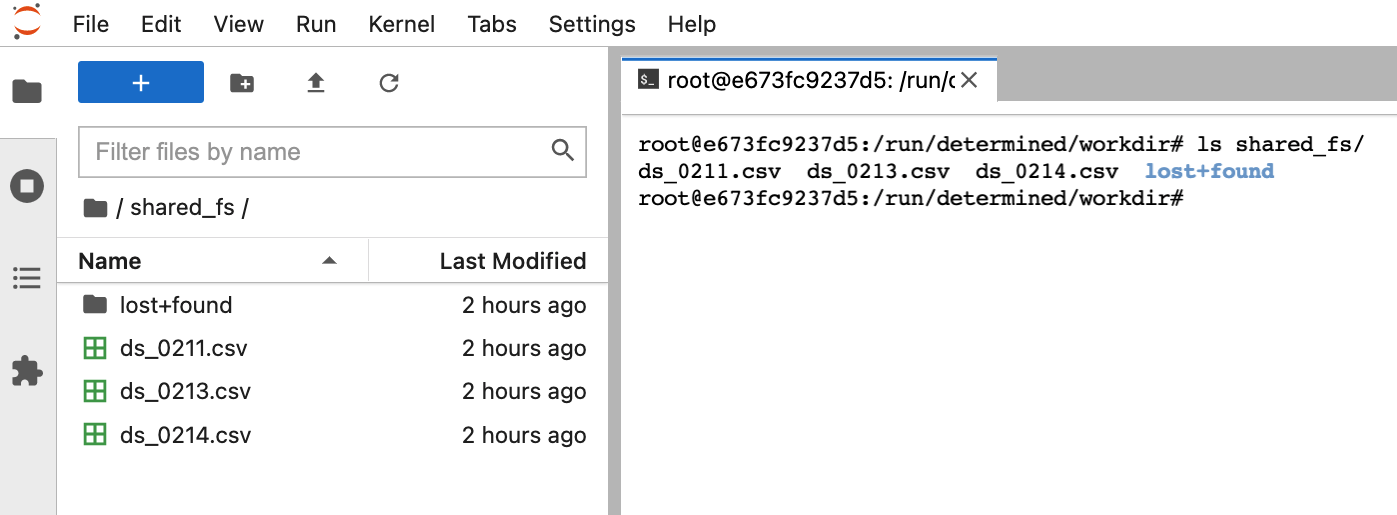 The mounted file system allows to access files from different notebook containers.
Minimize Time-to-Start and Errors with Configuration Templates
Within a team, Notebook configurations tend to be similar. For that reason, it can be helpful to create configuration templates that contain environment variables and Notebook container images. These templates can then be shared by teams to get started faster and to reduce the possibility of misconfiguration.
Using templates with notebooks is easy using CLI (Command Line Interface) commands.
First, create a YAML configuration file for your template:
cat > tpl-1.yaml << EOL
resources:
  agent_label: ''
  devices: null
  resource_pool: compute-pool
EOL
Next, create the template:
det tpl set compute-pool tpl-1.yaml
After the template is created, launch it using the CLI:
det notebook start --template compute-pool
Alternatively, select the template from UI when creating a notebook.
Install Your First Determined Cluster
To get started with Notebooks, install a cluster and deploy Determined on-premise or in the cloud:
Start a new cluster by running pip install determined followed by the det deploy command to install locally or in a cloud provider:
Local cluster: det deploy local cluster-up
GCP: det deploy gcp up --cluster-id CLUSTER_ID --project-id PROJECT_ID
AWS: det deploy aws up --cluster-id CLUSTER_ID --keypair KEYPAIR_NAME
det deploy installs a cluster using Terraform for Google Cloud Platform (GCP) or CloudFormation for Amazon Web Services (AWS) deployment.
You can also use Helm for Kubernetes deployment. Download the chart, modify the chart values.yaml file and run:
helm install determined-ai . -f values.yaml
Launch Your First Determined Jupyter Notebook
After cluster installation and deployment, start Jupyter Notebooks from the web UI with a few clicks:
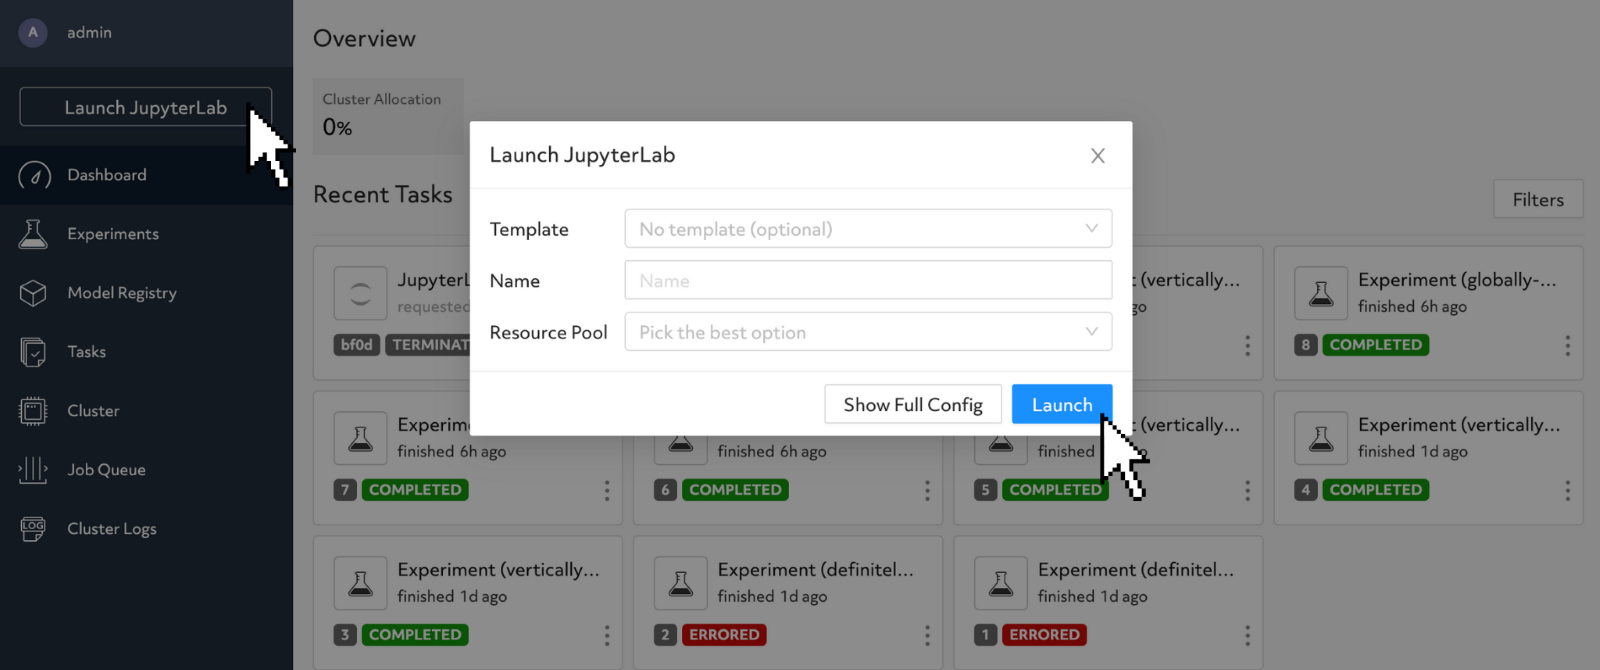
Creating a Jupyter Notebook using the UI.
- Click “Launch JupyterLab”.
- Complete the JupyterLab configuration prompt and click “Launch”.
You can also use the CLI to start notebooks:
det notebook start
Conclusion
In this blog post, you’ve seen how easy it is to get started deploying notebooks in Determined. We also discussed how features such as resource pools, persistence, templates, and timeouts can help teams manage infrastructure and increase productivity by simplifying the use of Jupyter Notebooks.
If you have trouble following the example or have questions about Determined, don’t hesitate to reach out to us on the Determined Community Slack.