SEP 11, 2024
Object Detection with Keras and Determined

February 03, 2021
This piece is part of the Determined AI Writers’ Program, which supports members of the ML community writing about their deep learning work with Determined.

Object Detection is an important task in computer vision. Using deep learning for object detection can result in highly accurate models, but developers can also run into several challenges. First, deep learning models are very expensive to train – even using GPUs, modern object detection models can take many hours of computation to train from scratch. Managing those GPUs and running workloads on many GPUs in parallel gets complicated fast. Second, object detection models typically have many hyperparameters. While algorithms exist to tune hyperparameters automatically, applying those algorithms in practice requires running hundreds or thousands of training jobs and comparing the performance of all those models. Talk about complex!
Determined makes training deep learning models and tuning hyperparameters much easier. It can automatically schedule jobs onto a cluster of GPUs (on-prem or in the cloud) and includes state-of-the-art algorithms for efficient hyperparameter tuning. It provides a real-time dashboard to track and visualize the results, enabling you to get a clear picture of how your model is performing in real-time – as a model developer, you can quickly kick off a training job or an HP search, and Determined will take care of the rest.
Determined also makes it easy to utilize multiple GPUs simultaneously, which means you can train a single model more quickly (using distributed training) or search through a massive hyperparameter space in less time – without modifying your code or dealing with managing GPUs by hand. Determined lets you focus on model development, so you can go from an idea to a working model in production much more quickly.
There’s more to Determined than meets the eye! To learn about what else Determined can do, check out the docs!
In this tutorial, you’ll start by installing Determined on AWS, and then modifying an off-the-shelf tf.keras object detection model to work with Determined. Next, you’ll train the model on a single GPU, and finally conduct a hyperparameter search.
The model being used is based on the Object Detection with RetinaNet using Keras tutorial.
A Brief Overview of the RetinaNet Object Detection Model
RetinaNet is a two-stage detector - it both localizes and detects the objects present in images. It uses a feature pyramid network to detect objects at multiple scales and introduces a new loss, the focal loss function, to alleviate the problem of the extreme foreground-background class imbalance. To understand the model in-depth, you can refer to the original paper, Focal Loss for Dense Object Detection.
Setting up Determined
I have deployed the deep learning model on an AWS p2.xlarge (P2) instance. However, you can use GCP or an on-premise Linux instance of your choice. The instance where the master is running should have at least 200GB of disk space; each agent instance should have 50GB of disk space. For this tutorial, we will use a single agent and deploy both the master and the agent to the same AWS instance.
To install Determined on a single AWS instance, follow these steps:
Each step is accompanied by code that is compatible with an Amazon Linux/RHEL/CentOS Linux instance.
Step 1: Set up your Linux instance - AWS, GCP, or on-premise.
Step 2: Make sure Python3 and Docker are installed on your Linux instance.
sudo yum install python3 docker
Step 3: Start the docker service.
sudo service docker start
Step 4: Assign global read, write, and execute permissions to the docker socket. (This is not a recommended practice for production systems!)
sudo chmod 777 /var/run/docker.sock
Step 5: Use pip to install det-deploy, which is a tool that we will use to install the rest of the Determined system.
sudo pip3 install determined-deploy
Step 6: Use pip to install Determined’s CLI. The CLI is used to submit new deep learning workloads for execution by the rest of the Determined system.
sudo pip3 install determined-cli
Step 7: Set the DET_MASTER environment variable; this tells the CLI the IP address or hostname where the Determined master is running. In this case, we’re deploying the master to the same instance where det-deploy is installed, so we can use “localhost”.
export DET_MASTER=<master-hostip>
Step 8: Bring up Determined master and agent.
If your system has a GPU, make sure the NVIDIA drivers are installed, as well as the NVIDIA container toolkit. Reference Links: Tesla and Container Toolkit
If you’re using an AWS instance with GPUs, run the following command:
det-deploy local cluster-up
If you’re using an AWS instance without GPUs, run the following command:
det-deploy local cluster-up --no-gpu
You should now have a Determined cluster set up in your workspace.
The procedure described above isn’t the only way to install Determined; for production deployments, it is suggested that you run the master on a single instance (without GPUs) and configure Determined to automatically provision GPU-equipped instances called “dynamic agents” as new deep learning workloads are submitted. For more details, explore the installation documentation.
Adapting RetinaNet To Work With Determined
Porting a model to Determined involves making the model compatible with the Determined API. For more on adapting existing model code to work with Determined, check out the Determined tf.keras tutorial.
Once our model code has been adapted to work with Determined, we will then train a single instance of the model and perform a hyperparameter search – without changing our model code!
You can download the model source code here.
Overview
Porting a model to Determined’s API is usually straightforward; if we have an existing training script, most of that code can remain the same, we just need to “refactor” it to fit into four different steps:
- Initialize your model
- Define your model
- Load the training data set
- Load the validation data set
You first have to initialize a model. This step involves defining all the hyperparameters that you might require while training the model.
Next, define your model’s layers, and the optimizer and loss being used.
Load train and validation data that you need for training and validating the model respectively.
Then arrange the four methods in a TensorFlow-based trial class - a Python class that inherits from the determined.keras.TFKerasTrial class as follows:
import keras

from determined.keras import TFKerasTrial, TFKerasTrialContext

class ObjectDetectionTrial(TFKerasTrial):
    def __init__(self, context: TFKerasTrialContext):
        # Initialize the trial class.
        pass

    def build_model(self):
        # Define and compile the model graph.
        pass

    def build_training_data_loader(self):
        # Create the training data loader. This should return a
        # keras.Sequence, a tf.data.Dataset, or NumPy arrays.
        pass

    def build_validation_data_loader(self):
        # Create the validation data loader. This should return a
        # keras.Sequence, a tf.data.Dataset, or NumPy arrays.
        pass
This trial class defines your model’s prototype.
How about the actual training and testing procedures that are typically involved in modeling a deep learning algorithm?
Determined provides a built-in training loop that automatically gets called after loading the training data. It logs the training and validation metrics and checkpoints the state of the model periodically.
With the prototyping in place, define every trial class method.
Initialization
This step involves the typical __init__() method which we see in a Python class. Determined passes an argument TFKerasTrialContext to this method that contains information about the hyperparameters used while training, along with other useful data.
For the current object detection model, store the context into an instance variable.
def __init__(self, context: TFKerasTrialContext):
    self.context = context
Create a file named startup-hook.sh with the content shown below. A startup hook is a special file that will be executed by Determined during the startup of each trial container, before invoking the user’s model code. It is useful for customizing the container environment (e.g., setting envrionment variables) and installing additional dependencies. In this case, we will use a startup hook to install the tensorflow_datasets library:
pip install -q -U tensorflow-datasets==4.1.0
Building the Model
This step involves defining the model’s architecture. The build_model() method, as seen in the trial class returns a compiled tf.keras.Model object. In this method, the model has to be wrapped by calling self.context.wrap_model() before it’s compiled and the optimizer needs to be wrapped by calling self.context.wrap_optimizer().
def build_model(self):
    resnet50_backbone = get_backbone()
    loss_fn = RetinaNetLoss(self.context.get_hparam("num_classes"))
    model = RetinaNet(self.context.get_hparam("num_classes"), resnet50_backbone)
    model = self.context.wrap_model(model)
    learning_rate_fn = tf.optimizers.schedules.PiecewiseConstantDecay(
        boundaries=[125, 250, 500, 240000, 360000],
        values=self.context.get_hparam("learning_rate")
    )

    optimizer = tf.optimizers.SGD(learning_rate=learning_rate_fn, momentum=0.9)
    optimizer = self.context.wrap_optimizer(optimizer)
    model.compile(loss=loss_fn, optimizer=optimizer)
    return model
Loading Data
Next, load the training and test datasets using the methods build_training_data_loader() and build_testing_data_loader(), respectively. Determined supports several APIs for loading data into a tf.keras model, including tf.keras.Sequence, tf.data.Dataset, or even a pair of NumPy arrays (for small data sets or test runs).
For now, load the object detection data into a tf.data.Dataset object.
def build_training_data_loader(self):
    label_encoder = LabelEncoder()
    train, dataset_info = tfds.load(
        "coco/2017", split="train[:5%]", with_info=True
    )

    autotune = tf.data.experimental.AUTOTUNE
    train = train.map(preprocess_data, num_parallel_calls=autotune)
    train = self.context.wrap_dataset(train)
    train_dataset = train.cache().shuffle(8 * self.context.get_hparam("batch_size"))
    train_dataset = train_dataset.padded_batch(
        batch_size=self.context.get_hparam("batch_size"),
        padding_values=(0.0, 1e-8, -1),
        drop_remainder=True
    )

    train_dataset = train_dataset.map(
        label_encoder.encode_batch, num_parallel_calls=autotune
    )

    train_dataset = train_dataset.apply(tf.data.experimental.ignore_errors())
    train_dataset = train_dataset.prefetch(autotune)

    return train_dataset
Similarly, load the test data using a tf.data.Dataset object.
def build_validation_data_loader(self):
    label_encoder = LabelEncoder()
    test, dataset_info = tfds.load(
        "coco/2017", split="validation", with_info=True
    )

    autotune = tf.data.experimental.AUTOTUNE
    test = test.map(preprocess_data, num_parallel_calls=autotune)
    test = self.context.wrap_dataset(test)
    test_dataset = test.padded_batch(
        batch_size=1, padding_values=(0.0, 1e-8, -1), drop_remainder=True
    )

    test_dataset = test_dataset.map(label_encoder.encode_batch, num_parallel_calls=autotune)
    test_dataset = test_dataset.apply(tf.data.experimental.ignore_errors())
    test_dataset = test_dataset.prefetch(autotune)
    return test_dataset
Make sure to include the miscellaneous functions required to run the model as well. The complete source code for the model can be found here.
Training the Model
Now that you’ve built your trial class, it’s time to define the hyperparameters to train your model. To achieve that, create an experiment to train a single instance of the model by defining the hyperparameters in a const.yaml file.
description: object_detection_retinanet
hyperparameters:
  global_batch_size: 64
  num_classes: 80
  batch_size: 1
  learning_rate: [2.5e-06, 0.000625, 0.00125, 0.0025, 0.00025, 2.5e-05]
records_per_epoch: 5000
searcher:
  name: single
  metric: val_loss
  max_length:
     epochs: 20
entrypoint: model_def:ObjectDetectionTrial
environment:
  # This model only works with TensorFlow 2.2+.
  image:
     cpu: "determinedai/environments:py-3.6.9-pytorch-1.4-tf-2.2-cpu-0f2001a"
     gpu: "determinedai/environments:cuda-10.1-pytorch-1.4-tf-2.2-gpu-0f2001a"
Here is a description of some of these settings in more detail:
-
global_batch_size: The batch size to be used for training. It must be specified for every experiment. -
num_classes: The number of classes present in the dataset. -
records_per_epoch: The number of records per epoch to be used for training. -
searcher: How the experiment’s hyperparameter’s space should be searched. For the time being, set it tosinglewhere no hyperparameter search is done. -
metric: The name of the validation metric to evaluate the performance of the model. -
max_length: How long the model should be trained for. In this case, we configure Determined to train the model on 20 epochs worth of training data. The number of records in an epoch is set by therecords_per_epochvariable above, so this corresponds to training the model on 100,000 records of data. -
entrypoint: Name of the trial class.model_defis the Python file andObjectDetectionTrialis the class. -
environment: Here, we configure the task environment to use TensorFlow 2.2, which is required for this model. By default, Determined uses TensorFlow 1.x.
To learn more about experiment configuration, see the experiment configuration reference.
Running an Experiment
With the prototyping done, you can now create an experiment using the Determined CLI. To do so, use the following command:
det experiment create -f const.yaml .
The ‘.’ specifies the directory to be used (. means the current directory), and const.yaml is the configuration file you created earlier. The -f flag is to print verbose output onto your terminal and to “follow” the progress of the experiment in real-time.
Evaluating the Model
The model evaluation is done automatically by Determined. To view the output, go to http://<master-hostname>:8080 and login as the “determined” user with an empty password.
You can select your experiment and view the training and validation loss curves in TensorBoard.
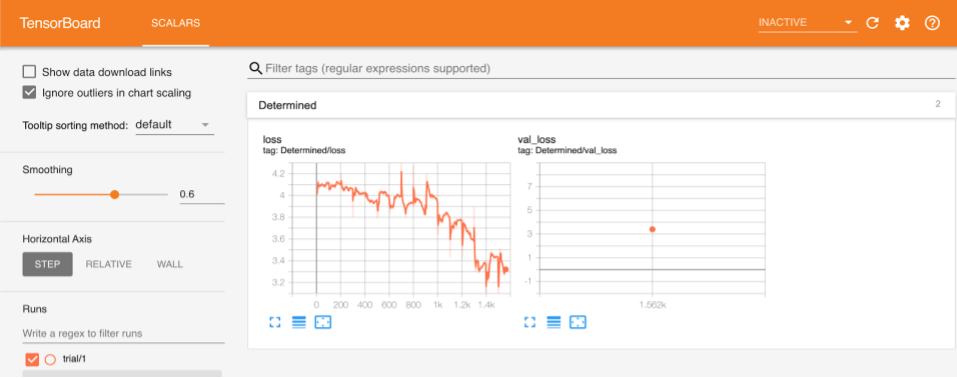
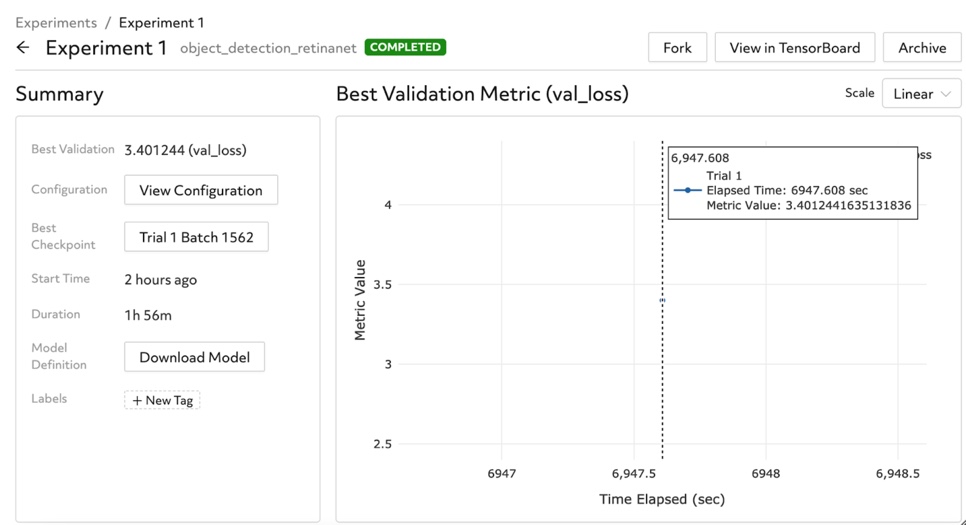
Training the model using the settings described above, we reach a validation loss of ~3.40.
You can also observe the best validation metric and checkpoint, as provided in the Determined dashboard.
Tuning the Hyperparameters
Hyperparameter tuning is an essential step in training and evaluating a model. The model’s effectiveness and accuracy highly rely on the values of its hyperparameters. Yet, hyperparameter search is a challenging problem that can be time-consuming and difficult to track.
Determined provides an easy-to-use hyperparameter search interface to the user to automatically use the built-in algorithms, track and visualize the experiments.
There are a variety of search algorithms provided by Determined, and you can use any of them to perform your hyperparameter search. For most situations, the “adaptive_asha” search method is often a good choice: it is a state-of-the-art early-stopping based technique that outperforms traditional techniques like random search by periodically abandoning low-performing hyperparameter configurations in a principled fashion.
Create a new file adaptive.yaml with the following content:
description: object_detection_retinanet
hyperparameters:
  global_batch_size: 64
  num_classes: 80
  batch_size: 1
  learning_rate:
    type: categorical
    vals:
      - [2.5e-06, 0.000625, 0.00125, 0.0025, 0.00025, 2.5e-05]
      - [2.5e-06, 0.00125, 0.000625, 0.0025, 2.5e-05, 0.00025]
records_per_epoch: 5000
searcher:
  name: adaptive_asha
  metric: val_loss
  max_trials: 2
  max_length:
      epochs: 10
entrypoint: model_def:ObjectDetectionTrial
environment:
  # This model only works with TensorFlow 2.2+.
  image:
     cpu: "determinedai/environments:py-3.6.9-pytorch-1.4-tf-2.2-cpu-0f2001a"
     gpu: "determinedai/environments:cuda-10.1-pytorch-1.4-tf-2.2-gpu-0f2001a"
Determined leaves it up to the model developer to declare which hyperparameters are important, and to define the search space for each of these hyperparameters. In this case, we have kept all of the hyperparameters fixed except for the learning rate, where we have specified a list of possible learning rates to explore.
Here, we configured the adaptive_asha searcher to explore two different hyperparameter configurations in total and train each configuration for at most ten epochs of training data. This is a minimal hyperparameter search, so it should run quite quickly!
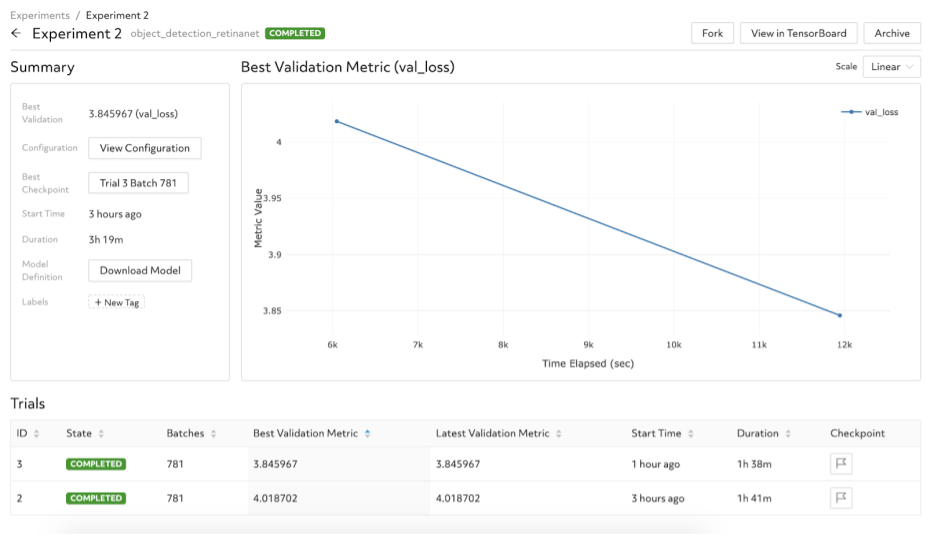
After creating the experiment using the command det experiment create -f adaptive.yaml ., you can view the training and validation loss graphs corresponding to the two trials.

You can also compare the validation losses between the two trials.
This is just a starting point: you can modify the configuration file to cause Determined to search for good settings for many other hyperparameters, and also increase the resource budget so that more configurations are explored – then you can observe how your model’s performance changes as a result!
Conclusion
As described above, Determined does automatic model evaluation without any manual intervention, simplifying model development and optimization. Determined does device initialization, scheduling, model checkpointing, and fault tolerance automatically.
Moreover, Determined also provides an option to perform distributed training to quicken the training process and optimally utilize the processing power you have.