SEP 11, 2024
The Determined Python SDK


December 06, 2023
The Determined Python SDK, a part of the broader Determined Python library, is designed to perform tasks such as:
- Creating and organizing experiments.
- Downloading model checkpoints, and adding them to the model registry.
- Retrieving trial metrics.
In other words, it has many of the same capabilities as the Determined CLI, with the benefit of allowing you to write all your logic in Python. To see how it works, let’s walk through a script that demonstrates some of the SDK’s features.
If you’d prefer to run the script now instead of reading further, then clone this GitHub repo and follow the instructions in the readme. If you have any questions, feel free to start a discussion on GitHub or join our Slack Community.
The Setting
Imagine we’re on a team of engineers that works on many different projects. Our current project is to train image classification models on three different MedMNIST datasets. To achieve this goal we’ll want to:
- Organize our experiments so that they are separate from all of our other projects.
- Train multiple models and tune hyperparameters to maximize accuracy.
- Save our best models in a place where we can keep track of them.
What the script does
The script:
- Creates a workspace and a project, as a way to organize our experiments.
- Reduces clutter by archiving old experiments that have the same names as the experiments we are about to run. Archiving an experiment makes it hidden, but still accessible.
- Creates models in the Determined model registry. You can think of these registry models as folders that can contain any number of model checkpoints. It’s a way to keep your checkpoints organized.
- Creates experiments for each dataset. A single experiment will train multiple models as part of a hyperparameter search to maximize accuracy.
- Waits for the experiments to complete, and retrieves metadata for the most accurate model checkpoints.
- Registers the best checkpoints in the Determined model registry.
Writing the script
Step 0: Imports and global variables
First, we import the necessary packages and create some global variables to hold the names of our workspace, projects etc.
from typing import Dict, List, Optional

from determined.common.api import errors
from determined.experimental import client
import medmnist
import yaml


WORKSPACE = "SDK Demo"  # The workspace that contains the projects
PROJECT = "MedMNIST"  # The project that contains experiments
MODEL_DIR = "mednist_model"  # Where the config and model_def files live
# We'll train models on the these 3 MedMNIST datasets
DATASETS = ["dermamnist", "bloodmnist", "retinamnist"]
DEMO_VERSION = "demoV1"
Step 1: Create a workspace and project
Next, we use the SDK to create a workspace and project, if they don’t already exist.
Which parts of the code use the Determined Python SDK? The parts with client, like client.create_workspace(workspace_name), and any of its derivatives, like workspace.list_projects().
def setup_projects(workspace_name: str, project_names: List[str]) -> None:
    try:
        workspace = client.get_workspace(workspace_name)
    except errors.NotFoundException:
        print(f"Creating workspace '{workspace_name}'")
        workspace = client.create_workspace(workspace_name)

    workspace_project_names = [project.name for project in workspace.list_projects()]
    for name in project_names:
        if name not in workspace_project_names:
            print(f"Creating project '{name}'")
            workspace.create_project(name)
Step 2: Archive old experiments
Here we archive experiments that are in our current project, have the same name as any of the experiments we want to run, and are in a non-running state.
The SDK is used to:
- Get our project’s id:
project_id = client.get_workspace(workspace_name).get_project(project_name).id
- Get experiments that are in our project and that match our name filter:
exps = client.list_experiments(name=name, project_id=project_id)
- Determine if an experiment is in a non-running state:
if exp.state.value in (...)
- Archive an experiment:
exp.archive()
Here’s the function:
def archive_experiments(
    experiment_names: List[str], workspace_name: str, project_name: str
) -> None:
    project_id = client.get_workspace(workspace_name).get_project(project_name).id

    for name in experiment_names:
        exps = client.list_experiments(name=name, project_id=project_id)
        for exp in exps:
            if not exp.archived:
                if exp.state.value in (
                    client.ExperimentState.COMPLETED.value,
                    client.ExperimentState.CANCELED.value,
                    client.ExperimentState.DELETED.value,
                    client.ExperimentState.ERROR.value,
                ):
                    print(f"Archiving experiment {exp.id} (dataset={exp.name})")
                    exp.archive()
                else:
                    print(
                        f"Not archiving experiment {exp.id} (dataset={exp.name}) because it is"
                        f" still in state {exp.state}"
                    )
Step 3: Create models in the model registry
To organize checkpoints, we create models* in the model registry. We move these newly created models to our workspace using
model.move_to_workspace(workspace_name=workspace)
This can help keep things organized and easier to find, especially in a large team setting where many people are creating models for different projects.
*A registry model is like a tag or folder that can contain multiple checkpoints. Each checkpoint within a model can have its own metadata and user notes.
Our function creates a single model, and we’ll call this function in a for-loop to create multiple models.
def create_model(name: str, workspace: str) -> None:
    workspace_id = client.get_workspace(workspace).id
    try:
        model = client.get_model(name)
        print(f"Using existing model '{name}' from the registry")
    except errors.NotFoundException:
        print(f"Creating new model '{name}' in the registry")
        model = client.create_model(name=name)

    if model.workspace_id != workspace_id:
        model.move_to_workspace(workspace_name=workspace)
Step 4: Create the experiments
This next function takes care of experiment configuration, creation, and labeling.
- Configuration: It loads the base experiment config file (
config.yaml), which contains common settings that will be used by all of our experiments. Then it modifies the configuration with dataset-specific information, like the number of samples per epoch. Note that another approach is to discard the yaml file, and instead define the entire configuration within the Python code. - Creation: It uses the experiment configuration and the path to the model training folder, to create an experiment that will train multiple models as part of a hyperparameter search.
- Labeling: It applies one or more labels to the newly-created experiment. These labels can be anything (e.g. a version number) that makes it easier to find our experiment in the future and gives us context when viewing it.
def run_experiment(
    dataset: str, workspace: str, project: str, labels: Optional[str]
) -> client.Experiment:

    with open(f"{MODEL_DIR}/config.yaml", "r") as file:
        exp_conf: Dict[str, str] = yaml.safe_load(file)

    exps = []

    # Set configuration particular to this dataset and example script
    exp_conf["name"] = dataset
    exp_conf["workspace"] = workspace
    exp_conf["project"] = project
    exp_conf["records_per_epoch"] = medmnist.INFO[dataset]["n_samples"]["train"]
    exp_conf["hyperparameters"]["data_flag"] = dataset

    print(f"Starting experiment for dataset {dataset}")
    exp = client.create_experiment(config=exp_conf, model_dir=MODEL_DIR)
    print(f"Experiment {dataset} started with id {exp.id}")

    for label in labels:
        exp.add_label(label)

    return exp
Step 5: Retrieve the best model checkpoints
When an experiment finishes*, we will:
- Check that it is in the
COMPLETEDstate, rather than some other state likeERROR. - Retrieve metadata about the best checkpoint.
*The exp.wait() command returns an exit status when an experiment finishes running.
def finish_experiment(exp: client.Experiment) -> client.Checkpoint:
    exit_status = exp.wait()
    print(f"Experiment {exp.id} completed with status {exit_status}")
    if exit_status == client.ExperimentState.COMPLETED:
        checkpoints = exp.list_checkpoints(
            max_results=1,
            sort_by=client.CheckpointSortBy.SEARCHER_METRIC,
            order_by=client.OrderBy.DESCENDING,
        )

        return checkpoints[0]
    else:
        raise RuntimeError(
            f"Experiment {exp.name} (id={exp.id}) did not complete successfully."
            f" It is currently in state {exp.state}"
        )
Step 6: Add the best checkpoints to the model registry (but first, call the above functions)
Finally, we have the main function that calls all of the above functions, passing in the names of our workspace, project, datasets, and experiment label.
In the for-loop at the very end of our main function, we add the experiments’ best checkpoints to the model registry. We also add a note to each checkpoint using the set_notes function, so that anyone who views the checkpoint can understand the context.
def main():
    client.login()  # Host address & user credentials can be optionally passed here

    setup_projects(
        workspace_name=WORKSPACE,
        project_names=[PROJECT],
    )
    archive_experiments(
        experiment_names=DATASETS,
        workspace_name=WORKSPACE,
        project_name=PROJECT,
    )
    exps = []
    for dataset in DATASETS:
        create_model(name=dataset, workspace=WORKSPACE)
        exps.append(
            run_experiment(dataset, workspace=WORKSPACE, project=PROJECT, labels=[DEMO_VERSION])
        )  # Run the experiments in parallel

    print("Waiting for experiments to complete...")
    for exp in exps:
        best_checkpoint = finish_experiment(exp)
        # models and experiments are both named after their medmnist dataset
        model = client.get_model(exp.name)
        model_version = model.register_version(best_checkpoint.uuid)
        model_version.set_notes(f"Creating using Determined SDK demo version {DEMO_VERSION}")


if __name__ == "__main__":
    main()
Running the script
To see the script in action, you’ll need additional files like the model training code and yaml config. Here’s how to get it running:
1. Clone the demo git repo:
git clone https://github.com/determined-ai/determined-examples/
cd determined-examples/blog/python_sdk_demo
2. Install the dependencies:
pip install -r requirements.txt
3. Set the DET_MASTER environment variable in your terminal.
For example, if you’re running this locally:
export DET_MASTER=localhost:8080
4. Run the script:
python determined_sdk_demo.py
As the script runs, you should see the following print to your terminal:
Creating workspace 'SDK Demo'
Creating project 'MedMNIST'
Creating new model 'dermamnist' in the registry
Starting experiment for dataset dermamnist
Preparing files to send to master... 6.2KB and 5 files
Experiment dermamnist started with id 1
Creating new model 'bloodmnist' in the registry
Starting experiment for dataset bloodmnist
Preparing files to send to master... 6.2KB and 5 files
Experiment bloodmnist started with id 2
Creating new model 'retinamnist' in the registry
Starting experiment for dataset retinamnist
Preparing files to send to master... 6.2KB and 5 files
Experiment retinamnist started with id 3
Waiting for experiments to complete...
Waiting for Experiment 1 to complete. Elapsed 1.0 minutes
Waiting for Experiment 1 to complete. Elapsed 2.0 minutes
Waiting for Experiment 1 to complete. Elapsed 3.0 minutes
Waiting for Experiment 1 to complete. Elapsed 4.0 minutes
Waiting for Experiment 1 to complete. Elapsed 5.0 minutes
Experiment 1 completed with status ExperimentState.COMPLETED
Experiment 2 completed with status ExperimentState.COMPLETED
Experiment 3 completed with status ExperimentState.COMPLETED
What it looks like in the WebUI
In your WebUI, you should see something like the following:
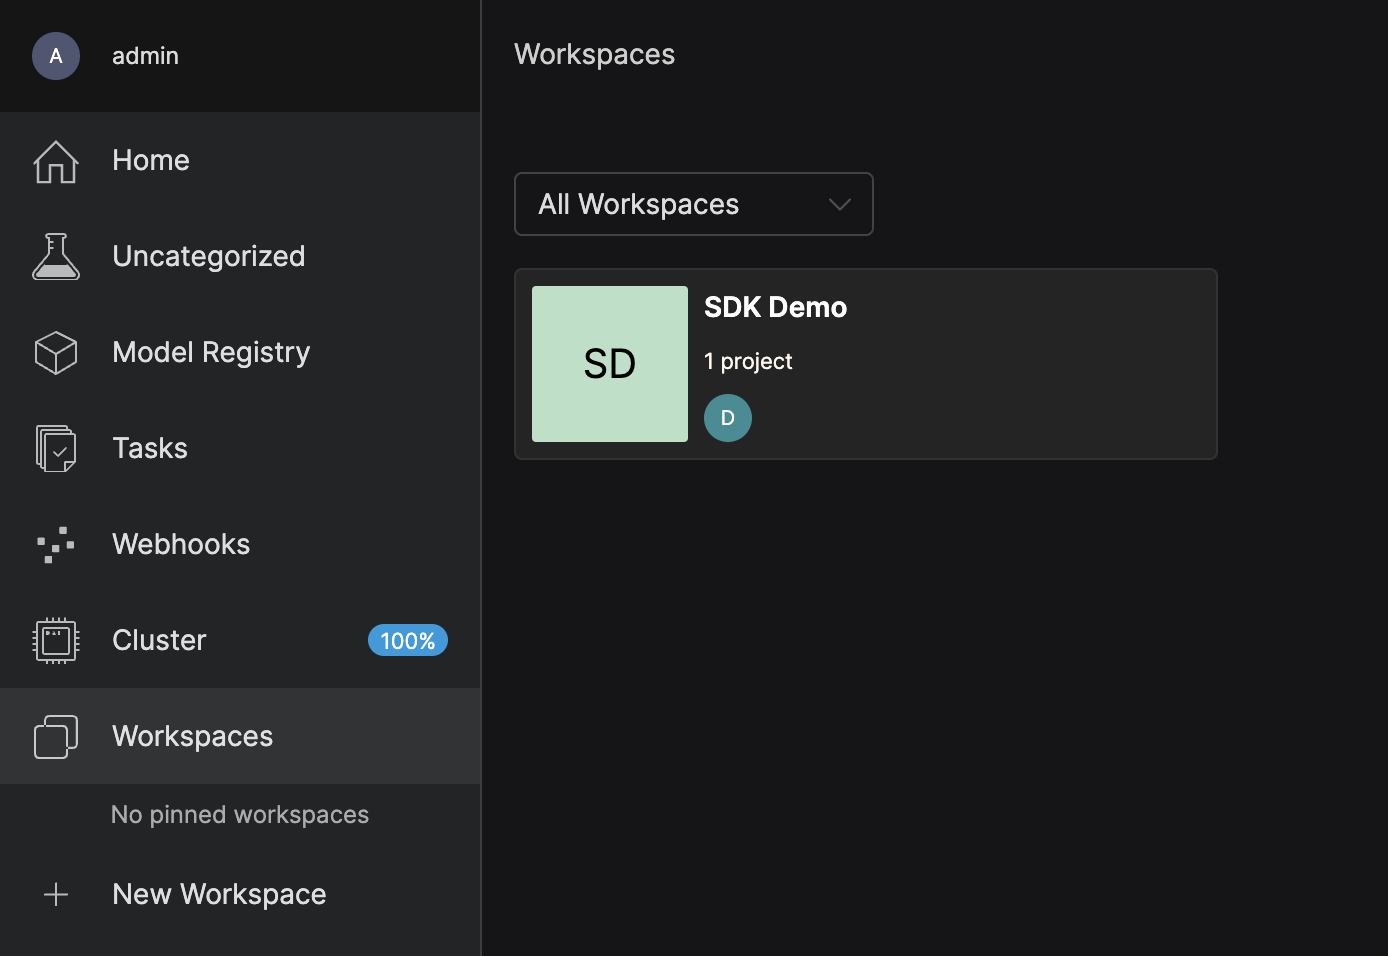
The SDK Demo workspace:
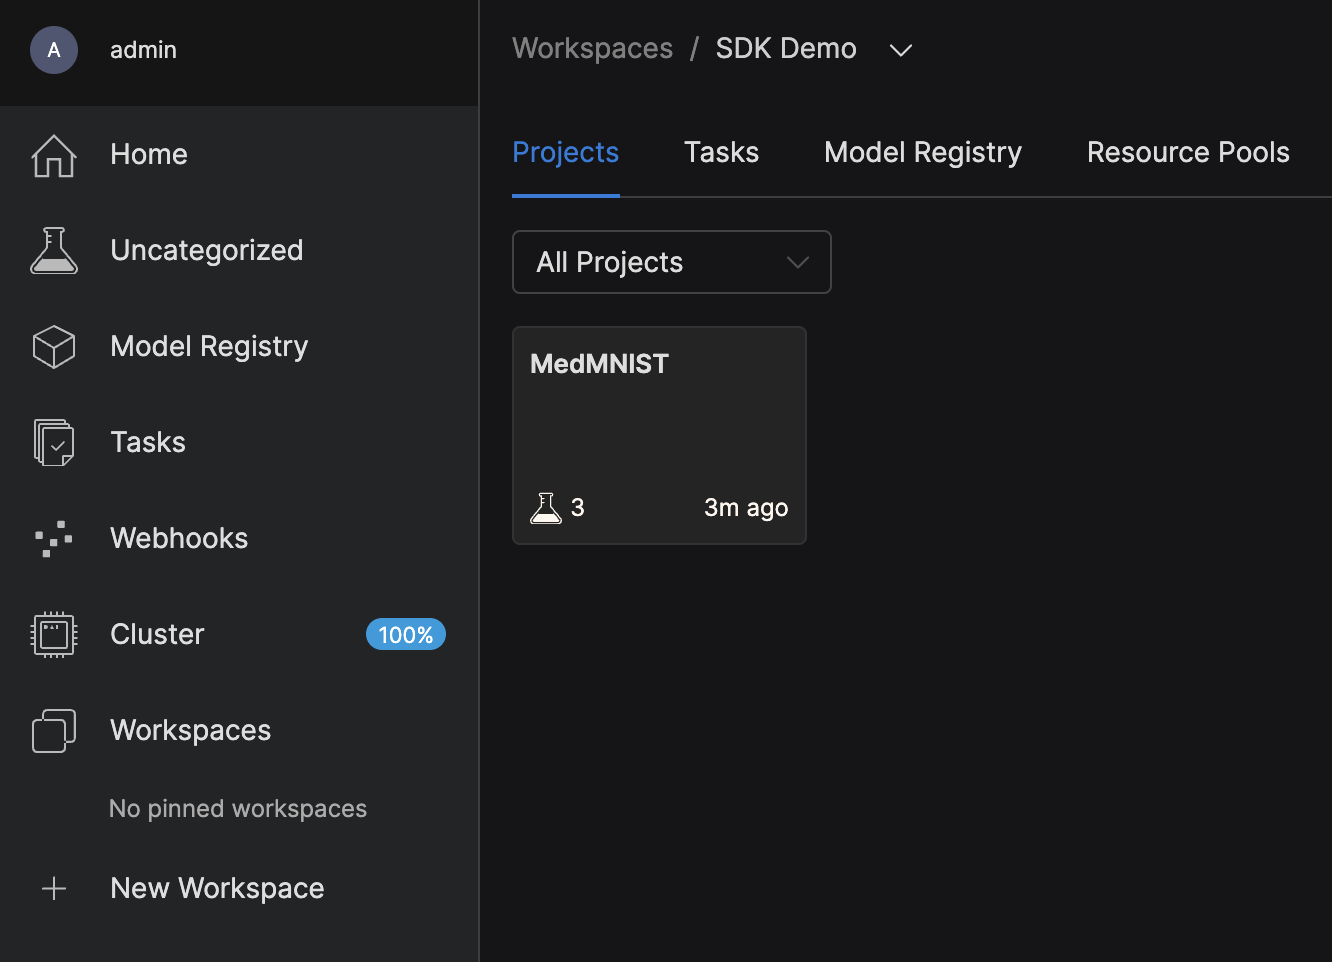
The MedMNIST project in the SDK Demo workspace:
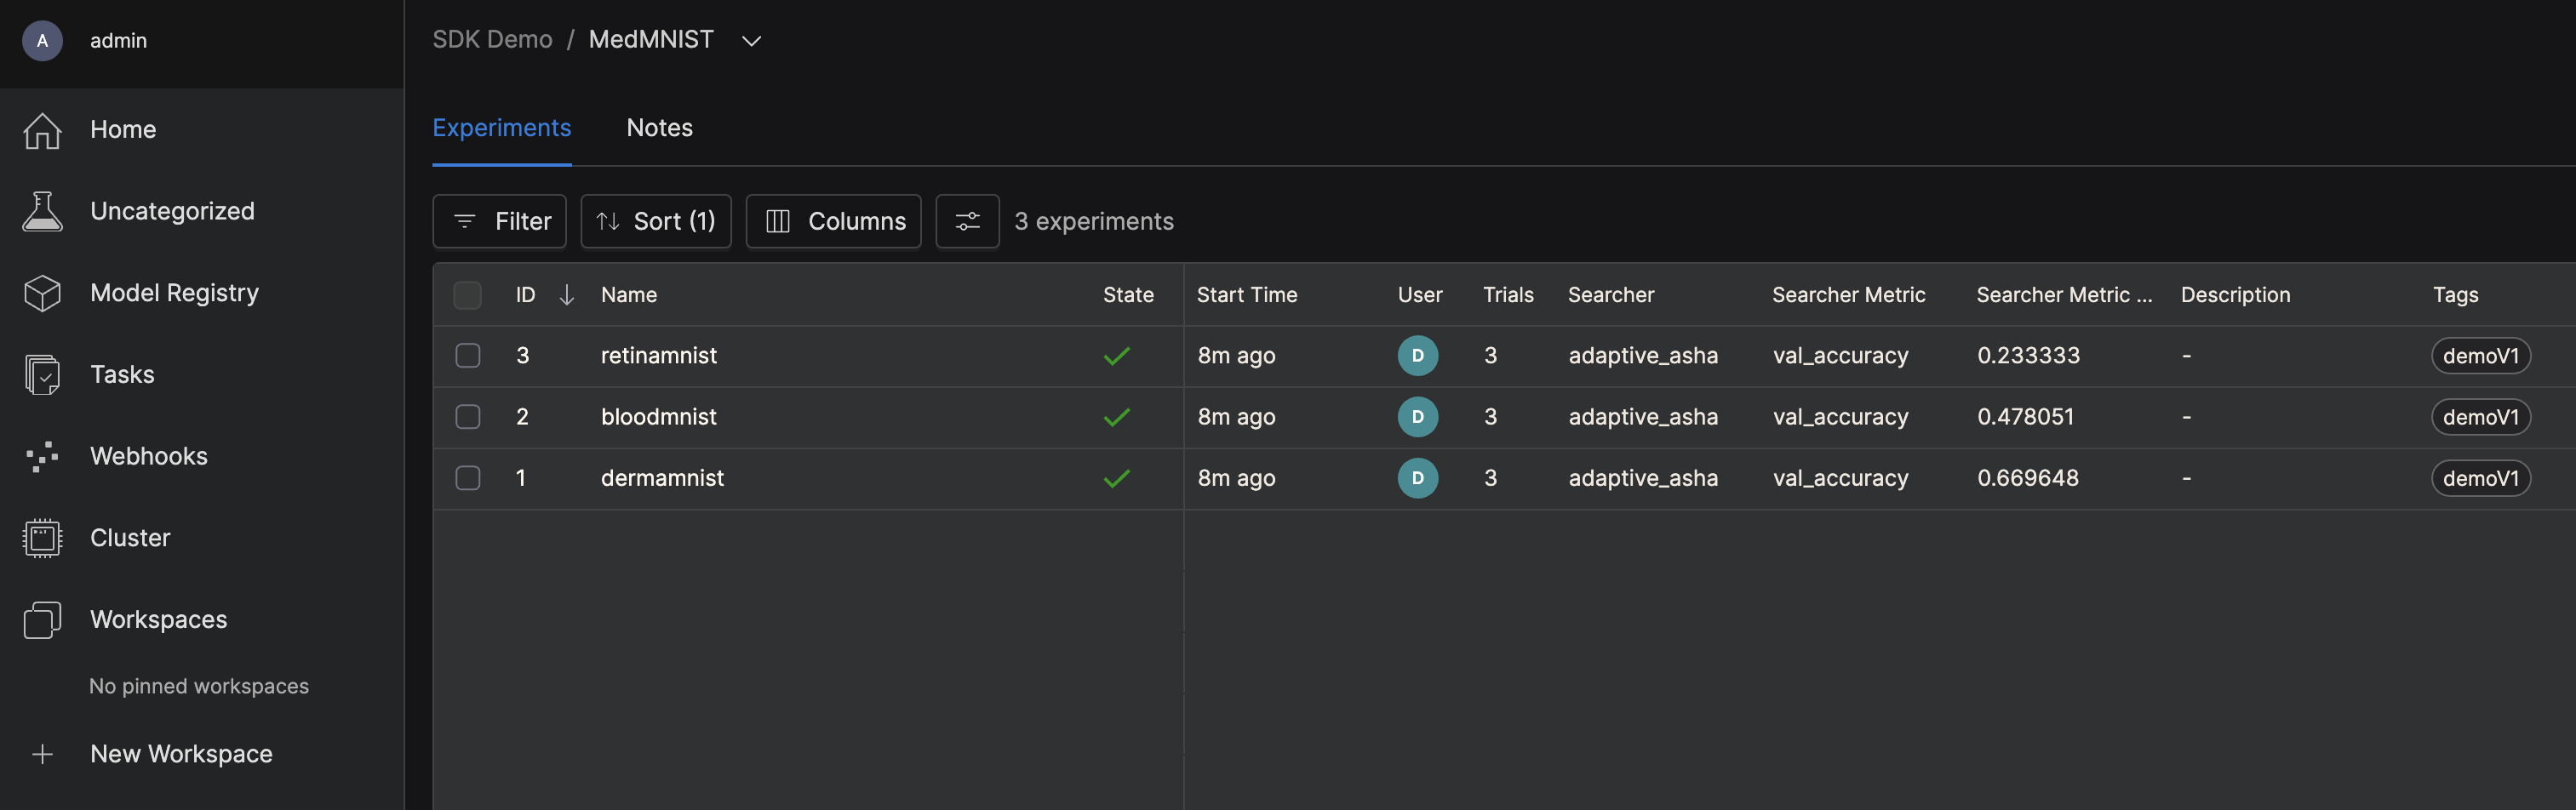
Three experiments in the MedMNIST project:
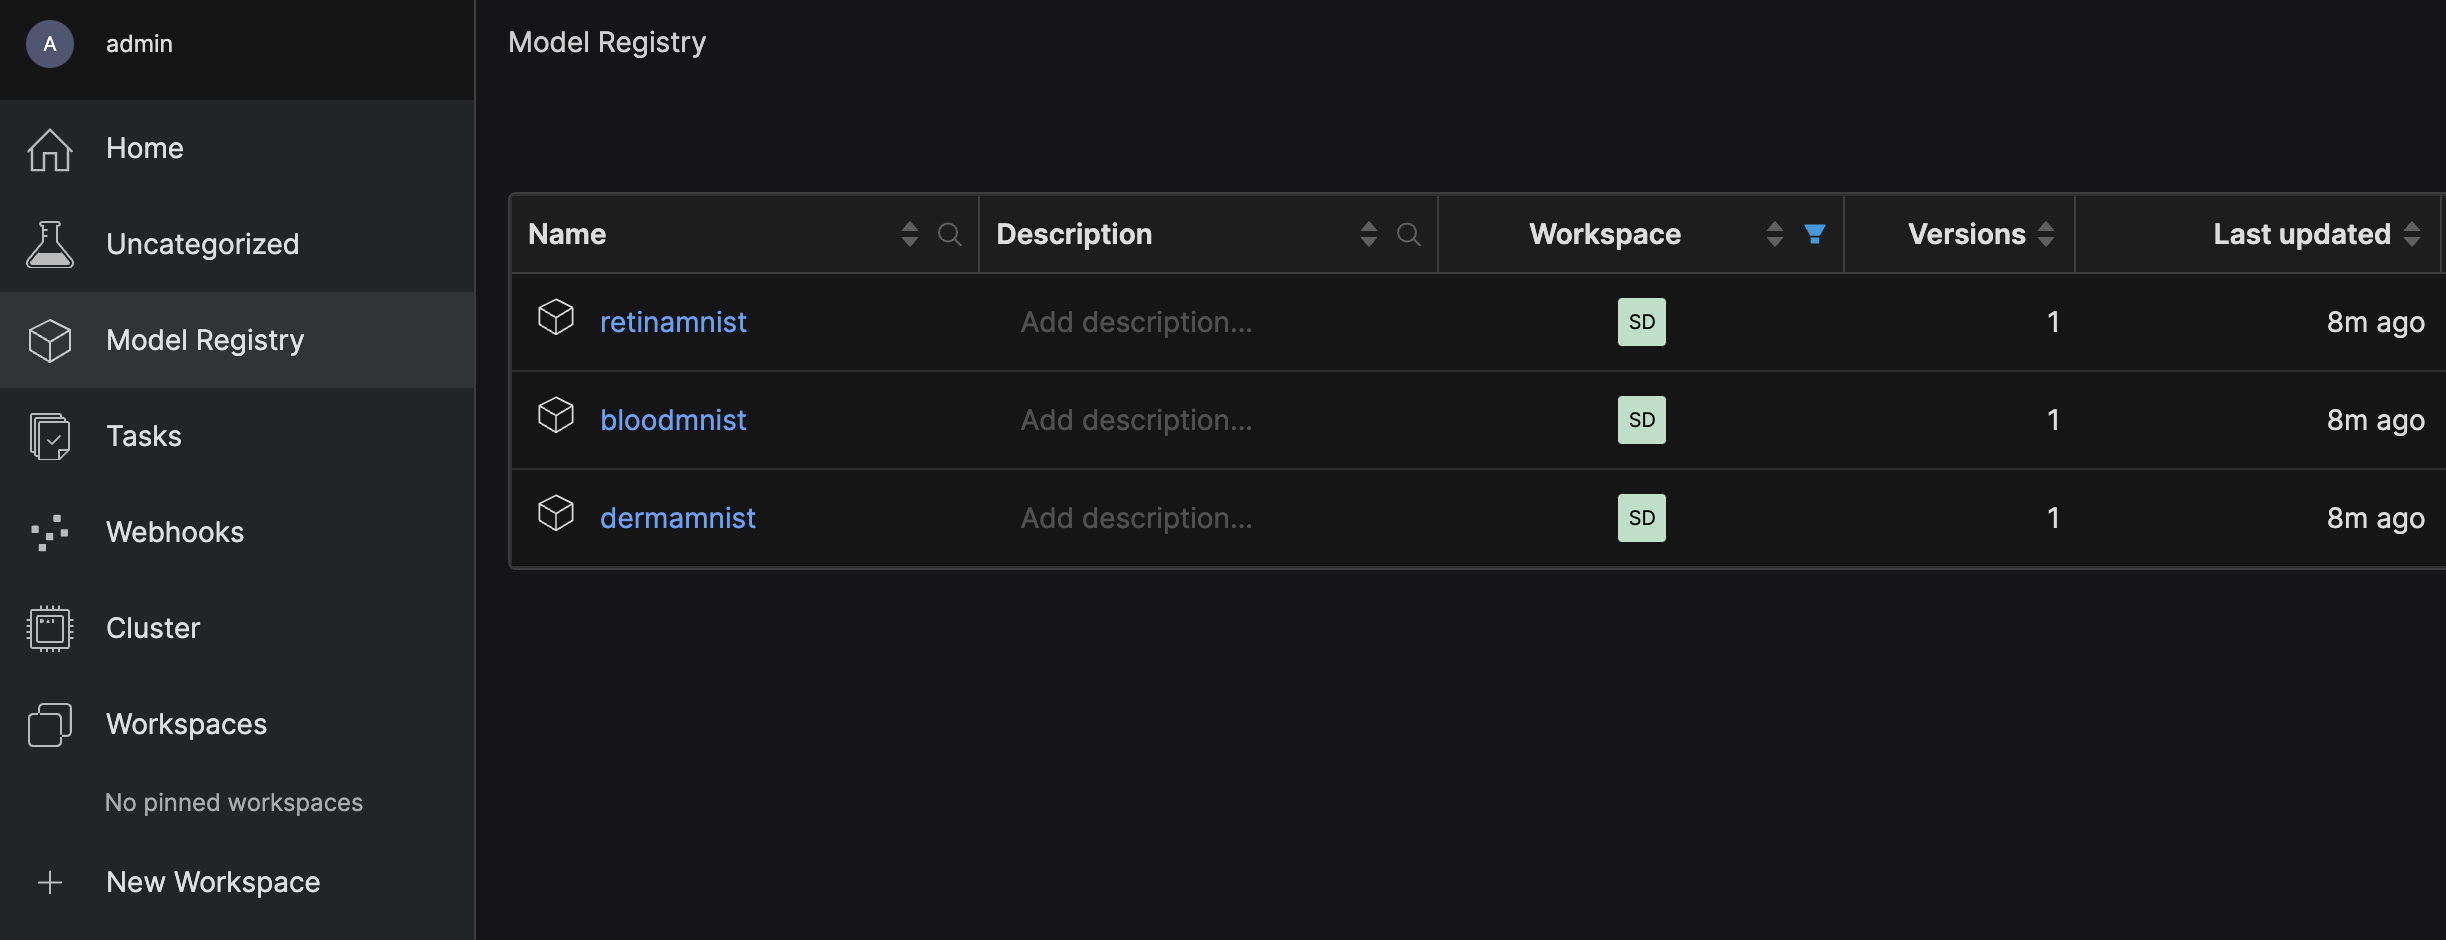
Three models in the model registry:
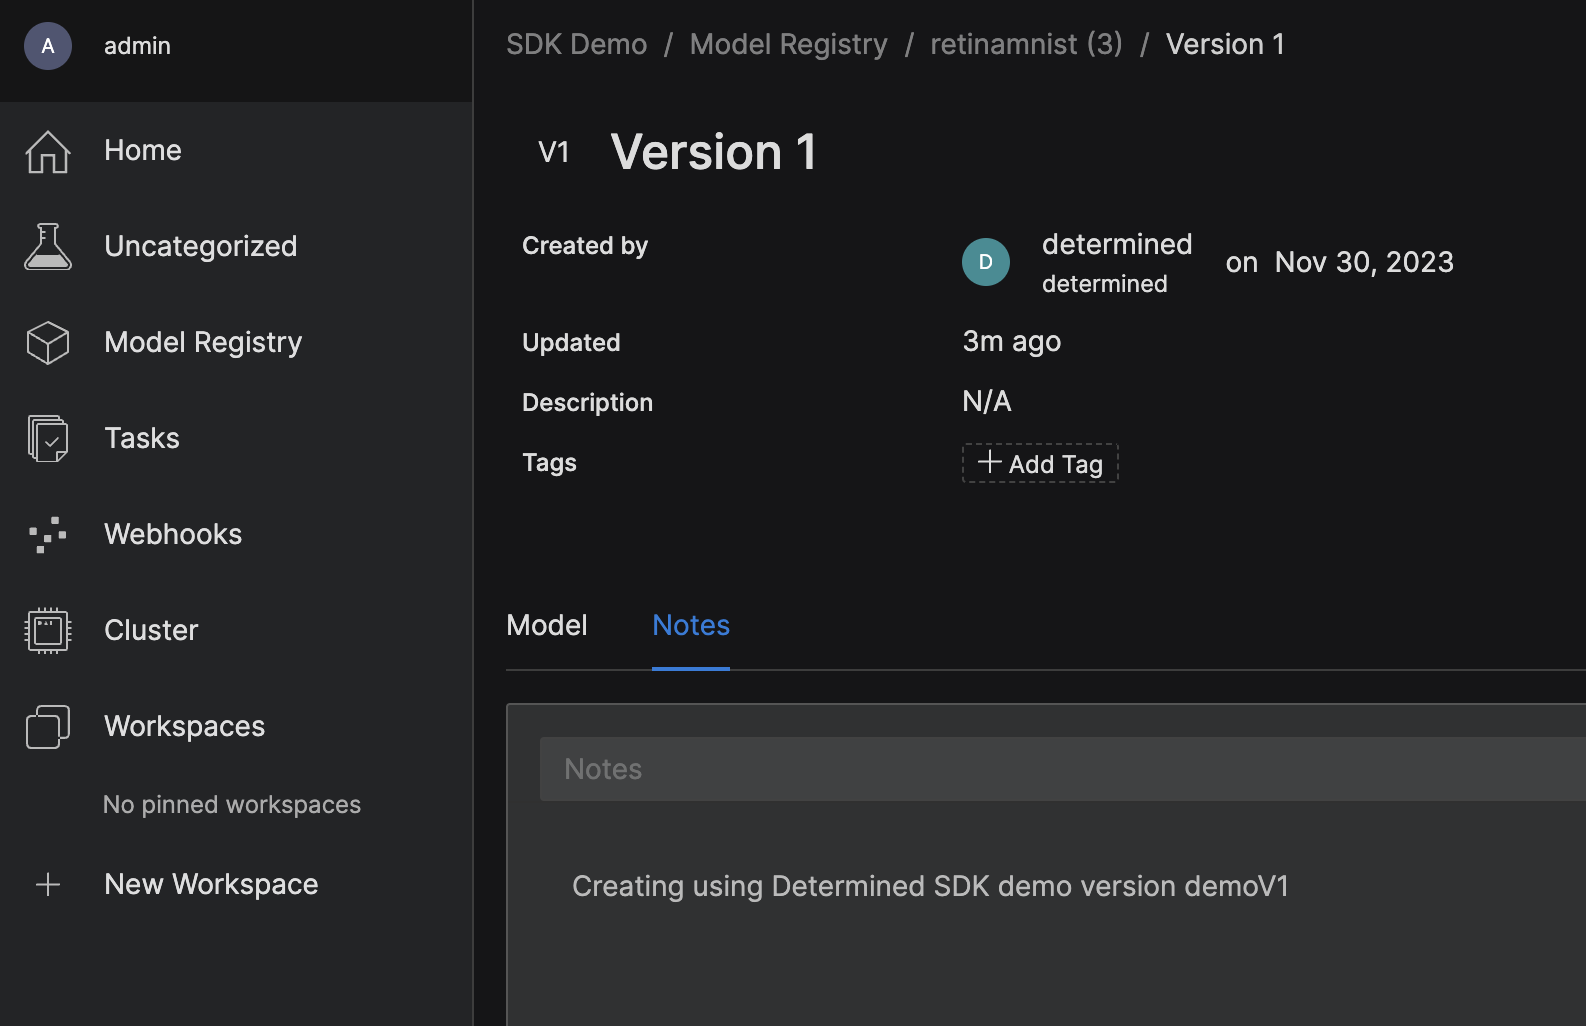
A checkpoint listed within each registry model:
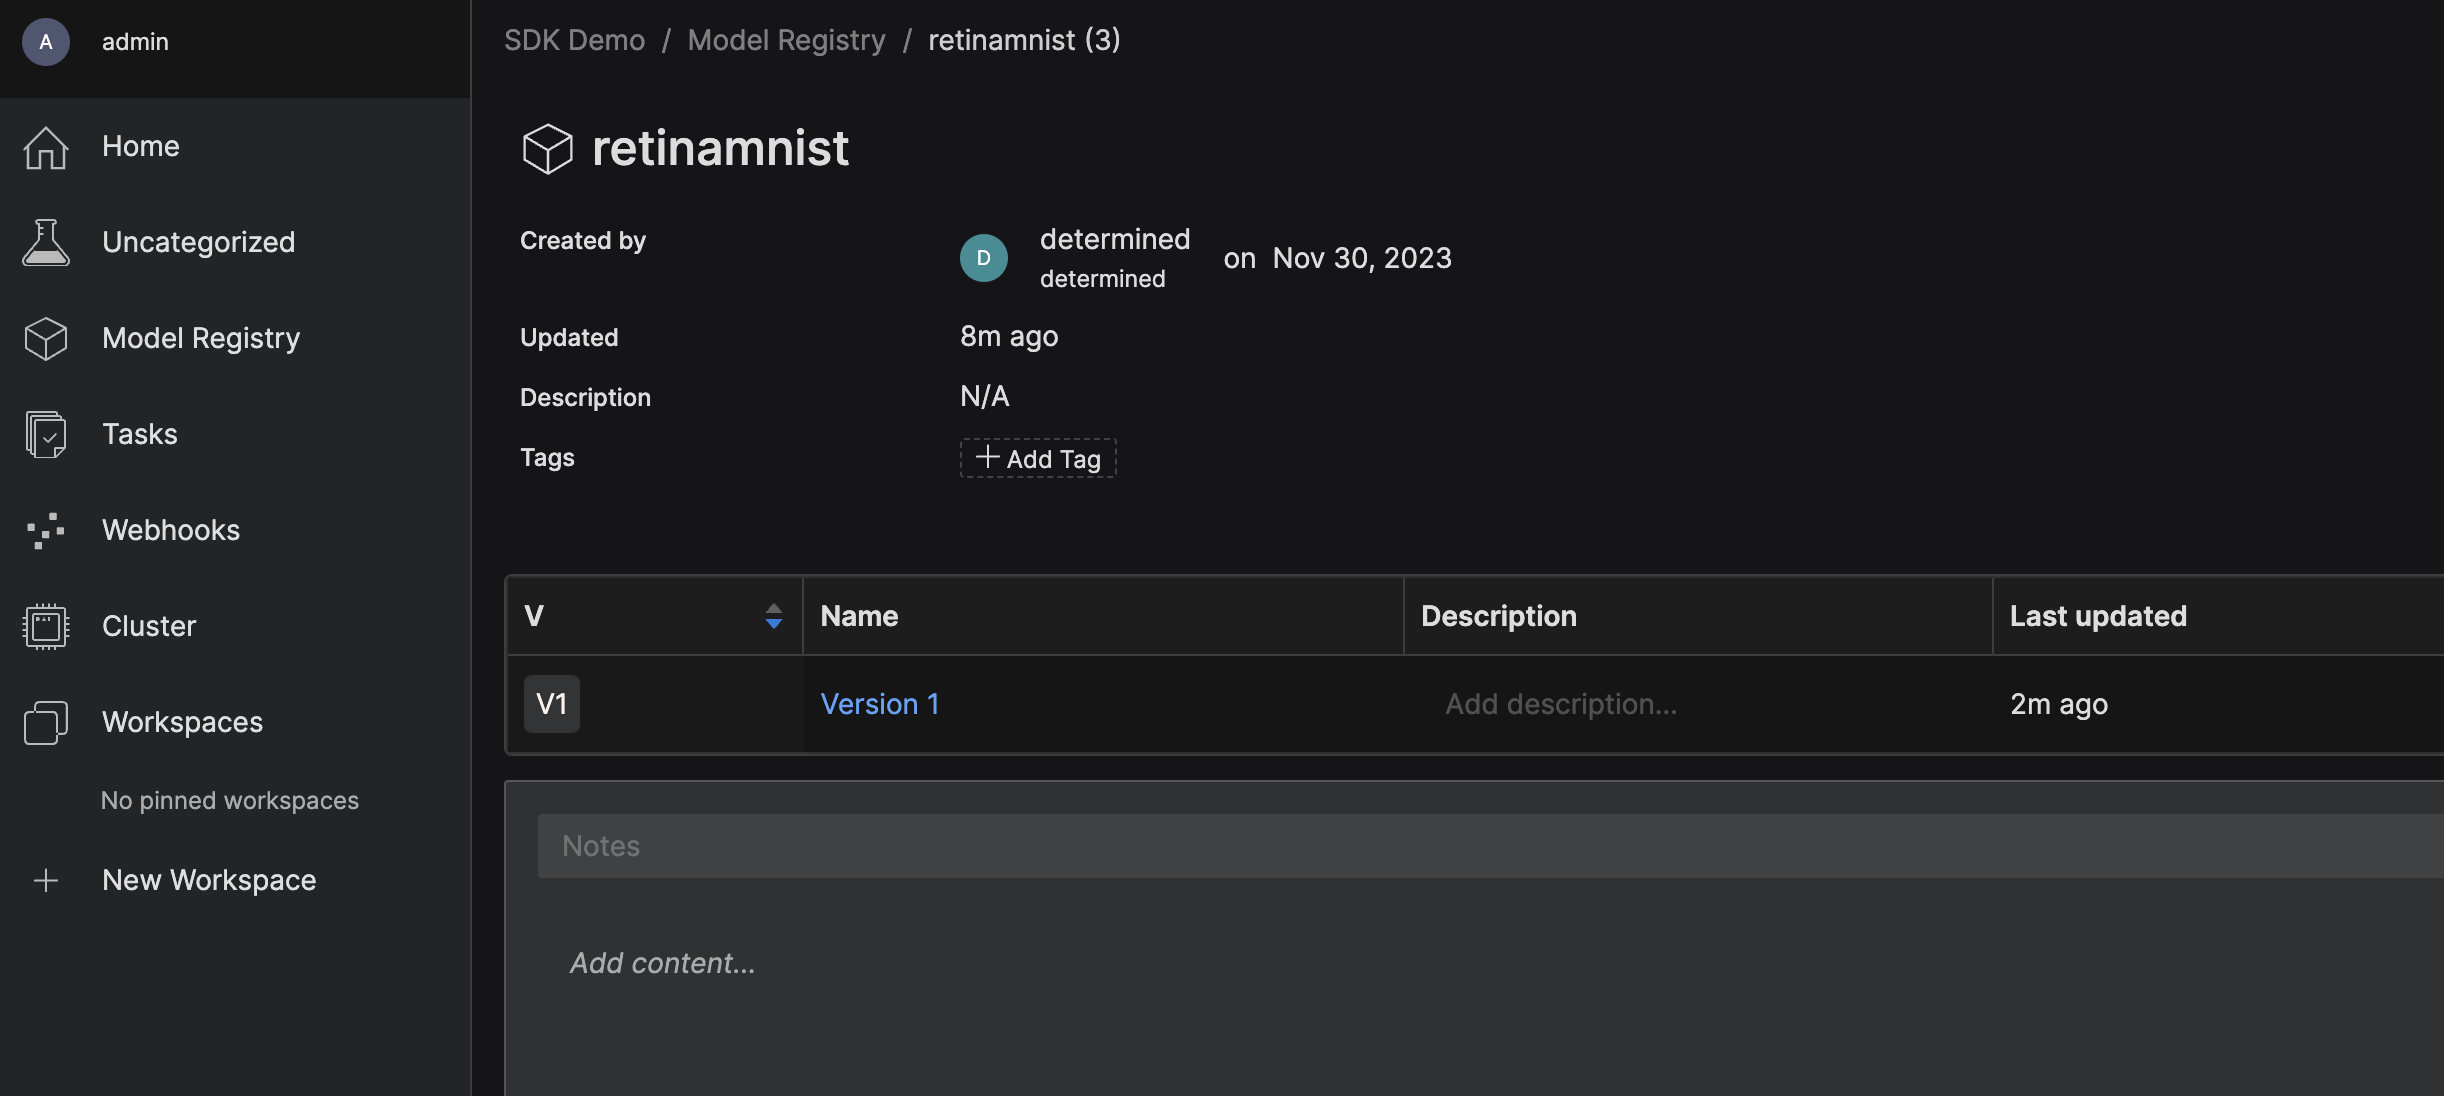
The text Creating using Determined SDK demo version demoV1 in the Notes area of each checkpoint.
Summary
In this blog post, we gave a walkthrough of a script that uses the Determined Python SDK. For more information about the SDK, please see the documentation.
If you want to learn about the other ways you can use Determined, check out our blog post that gives a high-level summary of all the Determined APIs.
If you have any questions, feel free to start a discussion in our GitHub repo and join our Slack Community!