SEP 11, 2024
Getting Started With Determined: A First-Time User’s Experience


May 11, 2022
Since joining Hewlett Packard Enterprise last summer, we’ve been working closely with the HPE Developer team to reach a wider audience of developers through blog posts, webinars, and newsletters. Our most recent collaboration is through the lens of a first-time user of Determined and focuses on getting Determined up and running on Kubernetes and HPE Ezmeral. Be on the lookout for the second part of this series, where Denis will focus on deploying Determined on a Jupyter Notebook and give you an inside look at distributed training and hyperparameter search.

In this two-part blog series, I’ll share my experience as a first-time user of Determined’s open-source deep learning training platform. This blog series aims to provide a high-level overview of the basic concepts behind Determined and why you should consider it if you have tried doing deep learning at scale.
In this first blog, I’ll put on my IT manager’s hat and explain how to deploy Determined on a Kubernetes cluster in an HPE Ezmeral Runtime Enterprise deployment. This setup will enable my organization’s data science team to try out Determined quickly and assess its capabilities for their data science work.
In the second part of this series, I’ll put on my ML Engineer hat as a member of a larger data science team that wants to get started with Determined and walk through some of its fundamental concepts. I’ll review how to train deep learning models using one or more GPUs with distributed training, and advanced functionality such as state-of-the-art hyperparameter search to improve model accuracy and find the best version of a model.
Components
Out-of-the-box, Determined provides APIs, a command line interface (CLI), a web user interface, and other tools for accelerating model experiments with integrated capabilities such as distributing training and automatic model tuning with hyperparameter search.
HPE Ezmeral Runtime Enterprise
Built from the ground up to be open and run in hybrid environments, HPE Ezmeral Runtime Enterprise provides a secure, enterprise-level platform designed to run both cloud-native and non-cloud-native applications at scale. It provides an integrated data fabric, multi-cluster Kubernetes manager, enterprise-grade security, and multi-tenancy capabilities.
HPE Ezmeral Runtime Enterprise, pre-integrated HPE Ezmeral Data Fabric, provides all the networking, compute, and storage resources needed to run Determined on premise on Kubernetes.
Components Breakdown
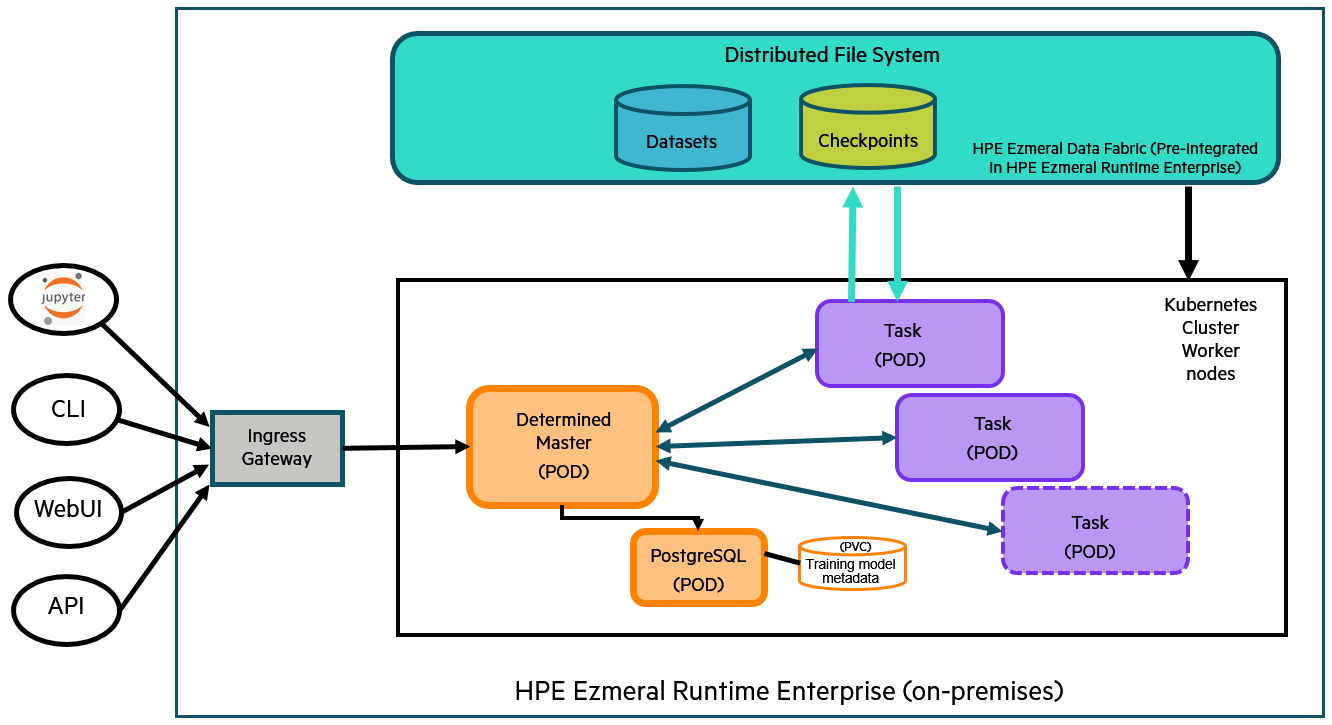
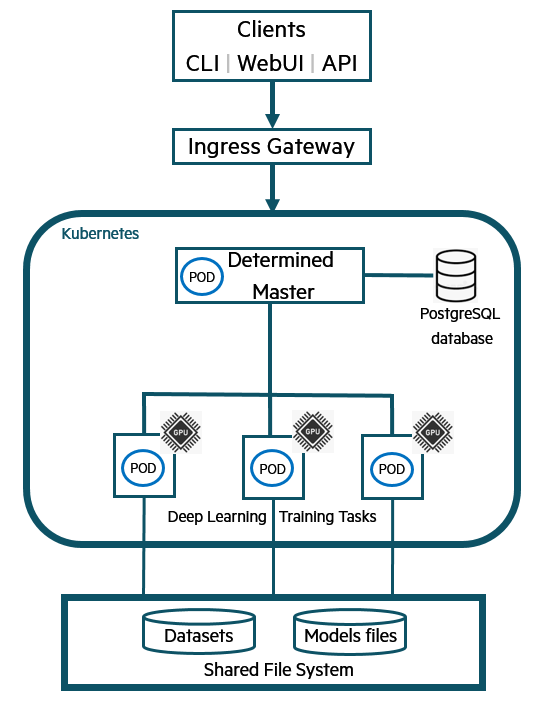
As the figure above indicates, my deployment of Determined consists of:
- A Kubernetes cluster, managed by HPE Ezmeral Runtime Enterprise, with a set of worker nodes with NVIDIA GPUs support enabled (one GPU device per worker node).
- A Determined Master, which is attached to a PostgreSQL database. The Determined Master and database run as containers, each within a Kubernetes pod, in the worker nodes of the Kubernetes cluster.
- The Master hosts the interface service endpoint that developers use to communicate with Determined through a CLI, WebUI, and APIs.
- The Master schedules tasks and brings up Kubernetes worker nodes to run tasks on demand; example tasks include model training and auxiliary tasks like running TensorBoard or Jupyter Notebook.
- As training tasks execute, the Master maintains communication with training task pods and saves training model metadata in the PostgreSQL database for model experiment tracking and analysis.
- An ingress gateway that makes the Master reachable from outside the Kubernetes cluster.
- A persistent storage volume for experiment tracking which logs the model’s metadata information, such as the hyperparameters and training and validation metrics (logs, date, time), on the PostgreSQL database.
- A volume shared across the Kubernetes worker nodes. The shared file system is needed to store the model artifacts, such as model code and model checkpoint files. The model checkpoint files are saved versions of the validated models that data science teams can access later for testing and analysis. This makes them available to a deployment or serving solution such as Seldon Core. The shared file system can also be used by Determined to store the model datasets on which the model is trained.
Installing Determined on Kubernetes & HPE Ezmeral Runtime Enterprise
Determined is available as a Helm chart and can be installed on a Kubernetes cluster running on HPE Ezmeral Runtime Enterprise. As such, I can download the chart and modify the chart values.yaml file before installing the Helm chart in my Kubernetes cluster.
- Before deploying the Helm chart, let’s discuss how to connect Determined to a shared storage volume. For this, I need to create a new tenant named
determinedaion HPE Ezmeral Runtime Enterprise for my Kubernetes cluster, which serves as a Kubernetes “namespace”. Each tenant created in HPE Ezmeral Runtime Enterprise is automatically provisioned with a tenant’s shared storage volume on the pre-integrated HPE Ezmeral Data Fabric cluster located at/<DataFabric-clusterName>/exthcp/tenant-<ID>/fsmount. The tenant’s shared storage volume is then automatically mounted on each Kubernetes cluster’s host on the path/opt/bluedata/mapr/mnt. This enables Determined to connect to the shared storage/opt/bluedata/mapr/mnt/<DataFabric-clusterName>/exthcp/tenant-<ID>/fsmount/to access the training and validation datasets and store model artifacts.
Furthermore, some aspects of the Helm chart deployment must be configured before installing Determined on Kubernetes. Although most of the default Helm chart configuration settings are suitable for getting started with Determined on Kubernetes, some parameters must be configured in the values.yaml file to match the designated Kubernetes cluster deployment and available compute, storage, and network resources, such as:
- The Kubernetes NodePort service type which exposes the Determined Master service endpoint outside the Kubernetes cluster.
- The shared storage volume path used to save validated model files and checkpoints for fault tolerance.
- The amount of GPU resources (known as “slots”) available on the Kubernetes worker hosts.
- The advanced scheduler used for large Kubernetes clusters with multiple GPUs per worker host. For my experimental Determined deployment, as I only have one GPU per worker host, it is recommended to let Determined use the default Kubernetes scheduler to schedule training tasks.
- The Determined Admin and default user account passwords.
- The user-defined name for the Determined deployment.
For more information about the configuration options for the Helm chart deployment, see the installation guide documentation.
In my deployment, the following aspects are set in the chart values.yaml file as shown below. Other configuration settings are set to their default values.
useNodePortForMaster: true
checkpointStorage:
  type: shared_fs
  hostPath: /opt/bluedata/mapr/mnt/<DF-clusterName>/exthcp/tenant-<ID>/fsmount/checkpoints
maxSlotsPerPod: 1
clusterName: stagingdetai
defaultPassword: <myPassword>
With the namespace created, the kubeconfig file for the Kubernetes cluster sourced in my Linux workstation, and the Helm chart deployment configuration files in hand, I can deploy Determined software on the Kubernetes namespace determinedai using the following command:
helm install stagingdetai <relative path to determined-helm-chart repository> –n determinedai [--dry-run]
- Note: I recommend first using the
--dry-runflag to validate and verify the chart manifest before actual Helm chart deployment.
Upon completion, I can use the following commands to check the status of the deployment for my instance:
helm list -n determinedai
helm status stagingdetai -n determinedai
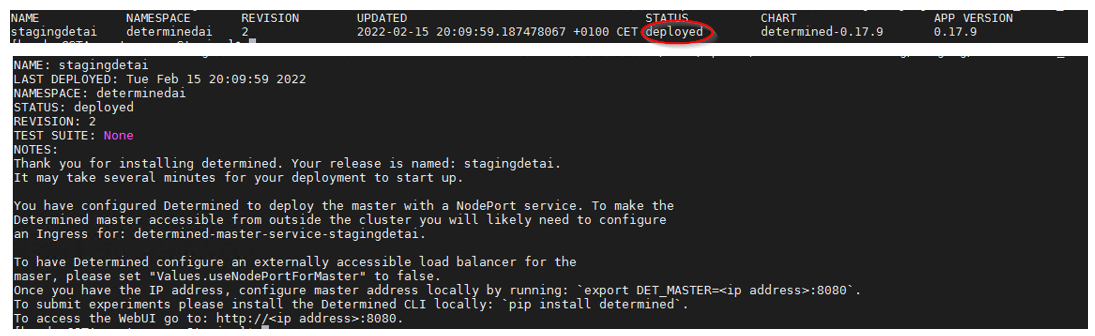
At the time of installation on the Kubernetes cluster, an instance of the Determined Master and a PostgreSQL database are deployed. Using the kubectl command below allows me to check the resources that are deployed on the cluster:
kubectl get pod,services –n determinedai
As shown above, these components run as a container within a Kubernetes pod. Service endpoints for the Determined Master and the database services are also deployed. The Determined Master service endpoint is a NodePort service that enables HPE Ezmeral Runtime Enterprise to expose that service outside the Kubernetes cluster through its ingress gateway.
Installing the Determined Command Line Interface
As mentioned earlier, Determined provides a web user interface (WebUI), REST API, Python API, and CLI to interact with the system. The CLI is the most common tool used by data scientists and ML engineers to interact with Determined, especially for launching deep learning model training tasks. The WebUI is mainly used to monitor the progress of model experiments and training tasks and to visualize the model training performance in graphs.
The Determined CLI is distributed as a Python package. I need Python 3.6 or later installed on my Linux workstation along with the latest version of pip. I can use the following command to install the CLI tool on my workstation:
#install latest version of pip if needed
python3 -m pip install --upgrade pip


#install the Determined CLI
pip install determined
I am now ready to enter Determined CLI commands. All commands begin with det and are formatted as follows:
det [-m <detmasterURLorIP:port>] <commandargument> <actionverb> [-h]
The Master service endpoint is referenced using the -m flag to specify the URL of the Determined Master that the CLI connects to. Instead of specifying the -m flag in every command, I can define an environmental variable, DET_MASTER, that points to the Determined Master service endpoint URL.
- Note: The help flag [-h] can be used to learn more about CLI options.
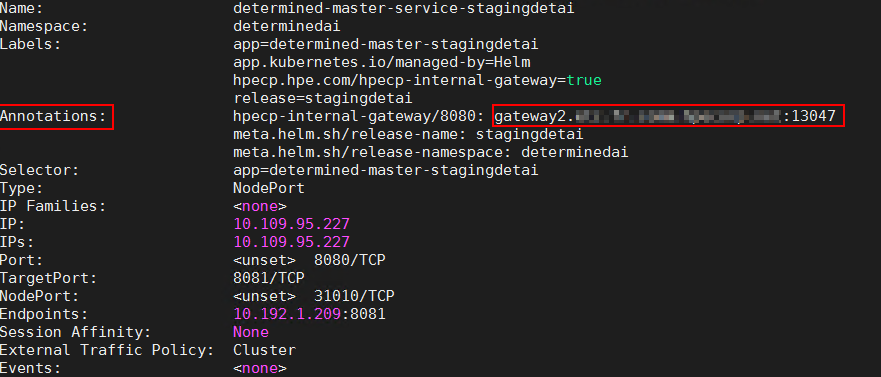
To use and interact with Determined using the CLI, I need to tell the CLI where the Determined Master service is running. To do so, I first use the kubectl describe service command:
kubectl describe service determined-master-service-stagingdetai -n determinedai
I can then look at the annotations section to get the ingress gateway URL and network port provided by Ezmeral for my deployment:

In the above example, the network port is 13047.
I now need to export the DET_MASTER environmental variable, which points to:
export DET_MASTER=http://gateway2.<mydomain.name>:13047
Finally, I need to authenticate as a Determined user. By default, at the time of installation, two user accounts are created: Admin, an administrator account, and Determined, a user account with the password specified in the Helm chart values.yaml configuration file. Using the following command allows me to authenticate as an admin user, after I enter the password through the CLI:
#format: det user login <username>
det user login admin
Creating user accounts for the data science team
Determined is designed for data science teams. As such, I’d recommend creating a user account for each member of the team who wants to use Determined. This provides the benefit of associating each of the Determined features, such as model experiments and associated training tasks, with the user who created it.
During my experience, I created users using both the CLI and the REST API. In both cases, it’s a two-step operation:
1) create the user account
2) set the password
The Admin user account must be used to create a user account and to set the newly created user account password.
Using the Det CLI
After logging in as the Admin user on Determined, I can use the following command to create a test user account:
# Create the user account
det user create <username>
First, I create the user account. The newly created user account has a blank password by default. Then, I set the password for the user account using the second command, which prompts me for the password and password confirmation.
# Set the password for the user account
det user change-password <target-username>
Using the REST API for a programmatic approach
Unlike the DET CLI, which requires keyboard input for the password, a programmatic approach to creating user accounts might be more appropriate depending on the organization’s use case. Determined is also REST API enabled, for which you can read the documentation here.
Below is the sequence of REST API calls that I can use to create a new user account (testuser1) in Determined and to set the password, all using code. I use cURL as an HTTP client but you can use your favorite HTTP library.
I first need to authenticate as the Admin user to Determined and save the authentication token (bearer token) for subsequent REST API calls:
token=$(curl -i -s -X 'POST' \
 '${DET_MASTER}/api/v1/auth/login' \
 -H 'accept: application/json' \
 -H 'Content-Type: application/json' \
 -d '{
 "username": "admin",
 "password": "<MyPassword>"
}' | grep token | awk '{print $1}' | tr -d '\r')


# Extract token value and remove trailing quotes
MyToken=$(echo $token | cut -d':' -f 2 | cut -d',' -f 1 | tr -d '"')
I then create a non-admin user account using the access token as the bearer token authentication:
# Create a new user account "testuser1"
curl -X 'POST' \
 '${DET_MASTER}/api/v1/users' \
 -H 'accept: application/json' \
 -H "Authorization: Bearer $MyToken" \
 -d '{
 "user": {
   "username": "testuser1",
   "admin": false,
   "active": true
  }
}'
Finally, I set the password for the newly created user account:
# Set password for the user account "testuser1"
curl -X 'POST' \
'${DET_MASTER}/api/v1/users/testuser1/password' \
 -H 'accept: application/json' \
 -H 'Content-Type: application/json' \
 -H "Authorization: Bearer $MyToken" \
 -d '"<userPassword>"'
- Note: The open-source version of Determined does not provide user access control features in case you have multiple data science teams (i.e. multiple tenants). Determined uses a local user directory as a convenient method to show the entity created by the logged-in users. However, the open-source version makes any entity (experiments, tasks) visible to all users, regardless of who created it. This can be a challenge for enterprises that need to keep strong model governance for audit purposes. This is one of the reasons HPE released the enterprise-ready edition of Determined, called HPE Machine Learning Development Environment, to address this limitation.
Checking connectivity to the WebUI
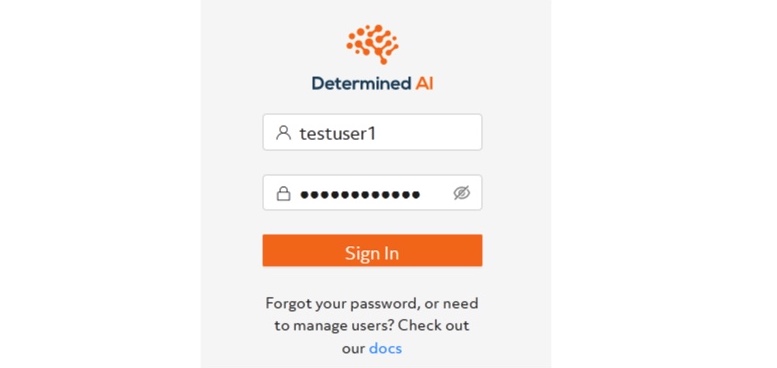
A good method to verify that a member of the data science team can interact with Determined is to test the connectivity to the WebUI, which is available on the same service endpoint URL as the CLI. Using my browser, I can connect to the Master service URL and verify that I am prompted to log in to the WebUI as shown in the following figure:

Once I’ve logged in, I land on the dashboard below. I’ll do a more comprehensive review of the WebUI in my second blog post in this series.
- Note: At the bottom left of the menu bar, you can see that having access to a running Determined instance allows me to navigate a Swagger UI version of the REST API in an interactive fashion.
That’s it! Everything is set. With my data scientist hat on, I’m ready to use Determined to train deep learning models in Determined using the CLI, visualize training results using the WebUI, and load and test models by making inferences.
Summary
As you can see, using my IT operations manager’s hat, I deployed Determined on a Kubernetes cluster running on HPE Ezmeral Runtime Enterprise, which provided all the components needed to run Determined:
- A task scheduler (in this case Kubernetes)
- A namespace
- Multi-tenancy
- An ingress gateway
- Persistent storage for experiment tracking
- A shared file system for storing model artifacts and datasets
In the second post in this series, I will walk through how to train a TensorFlow Keras model in Determined using features such as distributed training and automatic model tuning with hyperparameter search.
You can subscribe for updates from the HPE Dev Community by subscribing to our newsletter. I was able to write this blog post by joining and receiving help from the Determined Community Slack. You can begin training models with Determined today by visiting the project on GitHub.
This post originally appeared on the HPE Dev Blog and has been slightly modified from the original author’s work.