SEP 11, 2024
Getting Started With Determined: A First-Time User’s Experience, Part Two


August 10, 2022
Since joining Hewlett Packard Enterprise last summer, we’ve been working closely with the HPE Developer team to reach a wider audience of developers through blog posts, webinars, and newsletters. A few weeks ago, we released Part 1 of this series, which focused on getting Determined up-and-running for the first time. Here, Denis Choukroun deploys Determined on a Jupyter Notebook to take advantage of state-of-the-art deep learning capabilities. Enjoy!

Determined is an open-source training platform that aims to simplify deep learning (DL) model development for data science teams by providing tools like state-of-the-art distributed training, intuitive model tuning, GPU resource management, and automatic experiment tracking.
In the first blog in this series, I discussed how I deployed Determined on a Kubernetes cluster in an on-premise HPE Ezmeral Runtime Enterprise environment. I also showed how easy it is to get started with the Determined CLI, REST API, and Web User Interface to interact with Determined.
In the second part of this series, we’ll build off of our setup in Part 1 and assume the role of a Data Scientist or ML Engineer who wants to:
- Explore fundamental Determined concepts to successfully train a TensorFlow model
- Track and visualize the progress and results of training a model on a single GPU
- Use distributed training across multiple GPUs and fine-tune the model with state-of-the-art hyperparameter search
I’ll also use Determined’s Python API in a Jupyter Notebook to load and test the trained model and see how well it performs. I’ll evaluate this by making inferences using both a trained model and new data to make predictions.
Overview of Determined’s model training process
In short, Determined permits data science teams to launch deep learning model training tasks, called trials, for their ported model. These tasks are distributed across one or more GPUs and grouped as a Determined experiment using a particular set of configuration parameters specified in an experiment configuration file. This configuration file tells Determined how to run the model training process on Determined in terms of:
- The hyperparameters
- The number of GPUs to use for the training task
- The amount of data on which to train a model
- How often the trial task must report the training and validation metrics to the Determined Master
- How often the trial task must save the model file
…in addition to many other parameters.
The experiment configuration file and the Python code for the model used to load the datasets, build, optimize, and compile the model are collected in a model definition directory. The directory can optionally contain a startup-hook.sh script to install additional Python dependencies and libraries before the training process starts.
Note: The Experiment configuration file has required and optional fields. I’ll explore the most common fields in this post. To learn more about experiment configuration settings, check out the Determined documentation here.
The use case and the model
To get started with Determined, I need 1) a use case and 2) a model to train in Determined. As a Data Scientist running an experiment on Iris species, I picked the simple and well-known “Iris classification” model for predicting Iris species based on their sepal and petal length and width measurements.
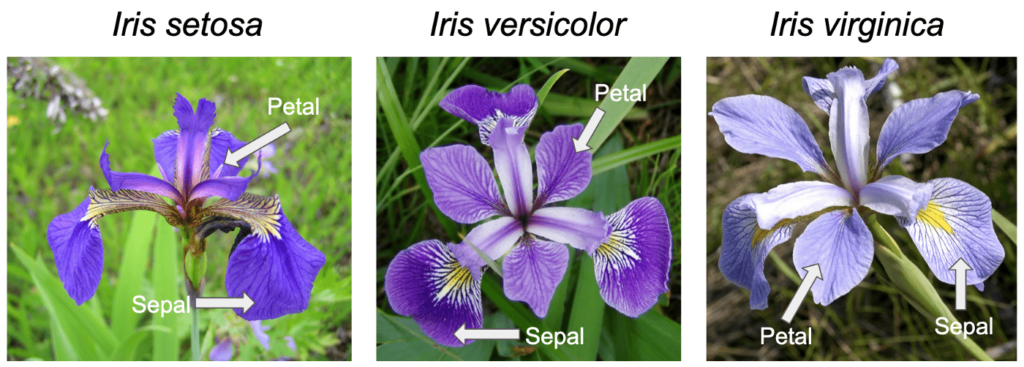
To take advantage of Determined’s capabilities, I need to port the model to one of the most-commonly used deep learning frameworks: PyTorch, TensorFlow, or Keras. You can check out the Iris deep learning model code in the Determined GitHub repository and download the complete code for this use case here. I’ll train the model on the publicly available Iris training dataset and validation dataset, which consist of 120 samples and 30 samples, respectively. Each sample consists of four Iris flower properties:
- Features: Sepal length, Sepal width, Petal length, Petal width
- Label: The species of Iris to predict
I’ve also stored a copy of the datasets in the shared storage volume for my Determined deployment described in the first post.
Note: Porting deep learning model code to Determined is beyond the scope of this blog post series. The easiest way to learn how to port an existing deep learning model code to Determined is to start with the PyTorch Porting tutorial as well as a video run through in a recent Lunch-and-Learn session on getting your first model up and running in Determined.
Now it’s time to see Determined in action!
Launching my first experiment on a single GPU
First, I’m going to launch an experiment with a single training task for the Iris deep Learning model. I’ll do this on a single GPU by defining the hyperparameters as fixed values in the experiment configuration file (const.yaml).
name: "iris_const_testuser1"
hyperparameters:# the hyperparameters to use for the training task
  learning_rate: 1.0e-4
  learning_rate_decay: 1.0e-6
  layer1_dense_size: 16
  global_batch_size: 30  # Number of data records within a batch
resources:
- slots_per_trial: 1 # Default. Use 1 GPU to train the model.
searcher:
- name: single # Single searcher method disables hyperparameter search (HPO)
- metric: val_categorical_accuracy  # the validation metric to evaluate the performance
- smaller_is_better: false  # the higher the metric the better the performance
- max_length: # Amount of data on which to train the model
  - batches: 5000 # set in the unit of batches (can be expressed as epochs too)

entrypoint: model_def:IrisTrial # Starting point of the model code
min_validation_period:
  batches: 1000 # Report validation metrics to Master every 1000 batches
scheduling_unit: 100 # Report training metrics to Master every 100 batches (default)
  bind_mounts: # Training and validation datasets location in shared volume
  host_path: /opt/bluedata/mapr/mnt/<DataFabric-clusterName>/exthcp/tenant-<ID>/fsmountrepo/data
  container_path: /opt/bluedata/mapr/mnt/<DataFabric-clusterName>/exthcp/tenant-<ID>/fsmount/repo/data
  read_only: true
At a glance, this configuration file is full of concepts that data scientists and ML engineers are familiar with, such as hyperparameters, batches, batch size, metrics, etc. From this file, Determined can actually take care of the model training for me.
Creating the experiment
With the const.yaml experiment configuration file and the model code in the model definition directory, I’m going to start an experiment using the Determined CLI:
det experiment create const.yaml <model-definition-directory>
Determined returns the experiment_Id and schedules the training task as a Kubernetes POD in my Kubernetes cluster. The POD container has all the libraries and dependencies required for training typical deep learning models with common deep learning frameworks like PyTorch, TensorFlow, and Keras.
I can then use another Det CLI commands to track the execution progress of my experiment:
det experiment list | tail -1
det experiment describe <my-experiment-Id>
Once the experiment completes, I can use the CLI command below to discover the performance metric for the best version of the validated model for my experiment:
det experiment list-checkpoints --best 1 <my-experiment-Id>
Visualizing and inspecting the learning curve of the trained model
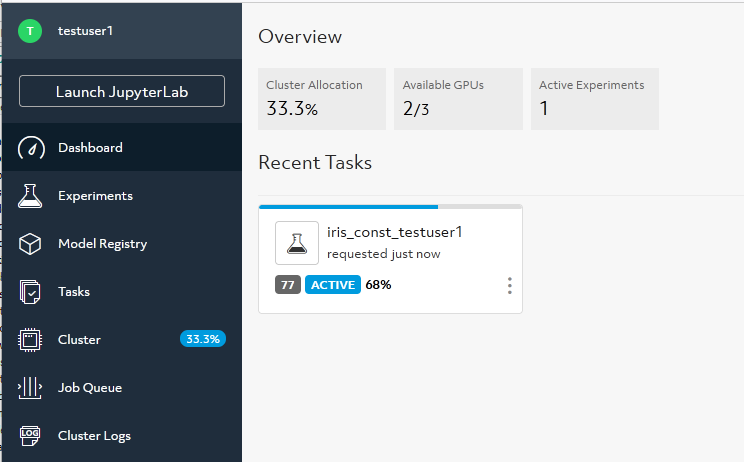
I can also access information on both training and validation performance for my experiment using the Determined WebUI. From the dashboard I can see my experiment status as shown in this screenshot:
Selecting the experiment, I can visualize the learning curve, which shows the model validation and training accuracy metric over the number of completed batches:
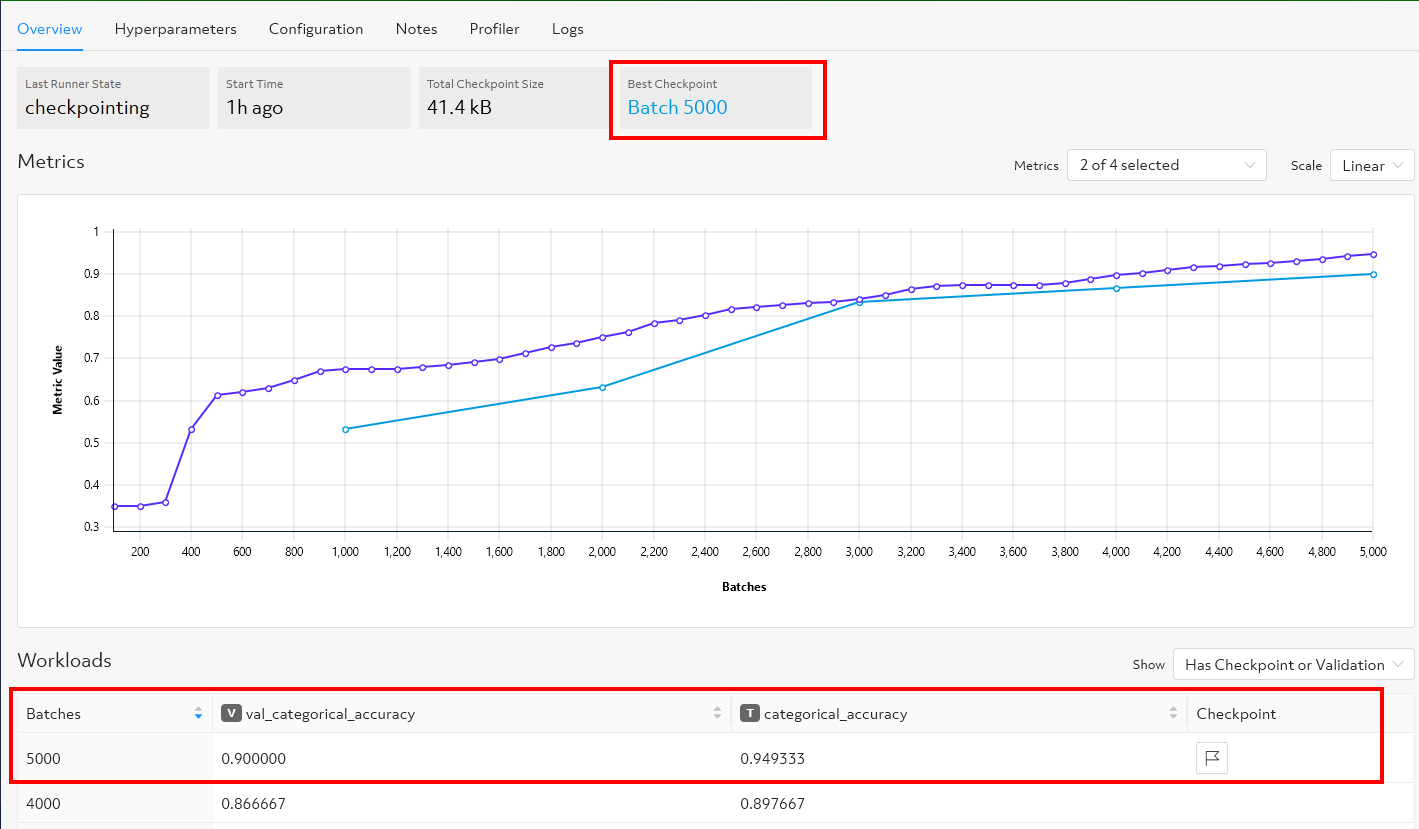
I can see the graph changing in real-time as the experiment runs. Determined plots training metrics every 100 batches of training data (the purple line) by default. Validation metrics (the blue line) are plotted every 1000 batches over the amount of data (5000 batches) based on the parameter det experiment list-checkpoints that I specified in the experiment configuration file.
Note: I can also use the CLI command
det experiment list-checkpoints --best 1 my-experiment-Idinstead of the WebUI to discover the performance metric for the best version of the validated model for my experiment.
I can also see the training and the validation metrics along with the checkpoints, which are the saved versions of the best-validated model. With the default checkpoint collection policy, Determined will checkpoint and save to a file the most recently validated model and the best model per training task (trial). If the most recent checkpoint is also the best checkpoint for a given trial, only one checkpoint will be saved for that trial as for my example above.
For data scientists familiar with TensorBoard, Determined also provides learning curve visualization through TensorBoard. I can launch a TensorBoard task from the WebUI or by using the Det CLI command:
det tensorboard start <Experiment-Id>
The TensorBoard server instance will be launched as a container POD in the Kubernetes cluster. To stop the instance, use the command:
det tensorboard kill <tensorboard-Id>
Using Jupyter Notebook for local inference
With the model trained and the model’s files saved on the shared storage volume for my Determined deployment, I can now test the best version of the model and see how well it performs using Determined’s Python API. To do this, using the command below, I start a CPU-only JupyterLab server instance in Determined with a bind-mounting configured to ensure the validated model file and checkpoint files are accessible by the JupyterLab instance. Like any other task launched in Determined, the JupyterLab instance is launched as a container POD in the Kubernetes cluster.
det notebook start --config-file Notebook-config.yaml
The Notebook-config YAML configuration file below is used to control aspects of the JupyterLab instance deployment. To learn more about Jupyter Notebook in Determined, check out the Notebook documentation.
description: My-notebook
resources:
  - slots: 0 # Launch a Notebook that does not use any GPUs
bind_mounts: # Validated model checkpoints location in shared volume
  - host_path: /opt/bluedata/mapr/mnt/k8s-df/exthcp/tenant-18/fsmount/checkpoints
  - container_path: /determined_shared_fs # Mount point the host_path is mounted to inside the JupyterLab POD container
idle_timeout: 30m
With the JupyterLab instance deployed, I use the command det notebook list to get the Notebook-Id, then connect to Jupyterlab instance using my browser at http://<DET_MASTER_URL>/proxy/<Notebook-Id>. Finally, I can use the Determined’s Python Client API and its Checkpoint API in the Python code below to download the best model file, load it into memory in a Python process for a Keras-based model, and make inferences.
#
# Import the libraries and the Determined’s Python libraries
#
import os
import numpy as np
from determined.experimental import client
from determined import keras
#
# Login to Determined system in order to interact with my Determined deployment
#
client.login(master=<DET_MASTER_URL>, user="MyUsername", password="MyPassword")
#
# Download the best model checkpoint from the shared checkpoint storage volume
#
myexpId="<experiment-Id>"
best_checkpoint = client.get_experiment(myexpId).top_checkpoint()
checkpoint_path = best_checkpoint.download()
#
# Load the best model checkpoint using the TensorFlow Keras Checkpoint API
#
model = keras.load_model_from_checkpoint_path(checkpoint_path)
#
# Now you can use the model to make predictions. Here I make 3 predictions.
# Mesasurement is Sepal length, Sepal width, Petal length, Petal width
X_new = np.array([[5, 3.9, 2, 0.5], [5, 2.5, 3, 1], [6.9, 3.1, 5.4, 2.1]])
prediction = model(X_new)
print("Let's predict the likelihood that the flower is the given Iris species 0: Iris setosa, 1: Iris versicolor, 2: Iris virginica {}".format(prediction))
print("")
print("the prediction of species for the 3 unlabelled examples is:")
print(np.argmax(prediction,axis=1))
Based on the flower’s measurements, the model will predict, for each unlabelled example, the likelihood that the flower is the given Iris species (Iris setosa, Iris versicolor, or Iris virginica) and print out the actual numeric value for each unlabelled example that has the highest confidence value.
Once I’ve finished with the test of my model, I can stop the JupyterLab instance and release computational resources on my Kubernetes cluster with the command:
det notebook kill <notebook-Id>
Distributed training on multiple GPUs with Determined
I am now going to launch another experiment that trains a single deep learning model across multiple GPUs, a process known as distributed training. Similar to my first experiment, this experiment will feature a single trial with a set of constant hyperparameters.
Determined can coordinate multiple GPUs to train a deep learning model more quickly on a single machine or over multiple machines. Typically, data science teams use distributed training to train models on larger datasets in order to improve the model performance and accuracy, which typically requires additional compute resources.
Determined automatically executes data parallelization training, where a data set is divided into multiple pieces and distributed across the GPUs, without requiring any model code changes. Each GPU has the full model code and trains the model on its portion of the data. Determined ensures the coordination of the training across multiple GPUs on a single machine or multiple machines to keep the whole training task in sync.
Note: Distributed training performs best with complex models. Therefore, my simple Iris model with a very small dataset will not demonstrate the full benefits of using distributed training in a real-world use case.
To launch a multi-GPU experiment, all I need to do is to specify the desired number of GPUs I want to use in the experiment configuration file and Determined takes care of the rest. To do this, in the experiment configuration file distributed.yaml, I just need to specify 2 GPUs per trial in the resources section:
resources:
  slots_per_trial: 2
I then launch the experiment using the command:
det experiment create distributed.yaml <model-definition-directory>
With this configuration, Determined runs a single trial for my experiment. The trial will use two GPUs to train my model, whether leveraging two GPUs on a single machine or two GPUs across multiple machines in the Kubernetes cluster.
Similar to the other experiments, I can navigate to the WebUI to monitor the progress of the training task for my experiment and visualize information on both training and validation performance over the number of completed batches. I can also use the same Determined CLI commands as I used for my first experiment to discover the performance metric for my model and launch auxiliary tasks such as TensorBoard or JupyterLab Notebook. I can also use the same Determined’s Python API code I used for my first experiment to load and test the trained model and see how well it performs to make predictions.
Automatic model tuning with Determined
Previously, I showed you how to easily distribute a training task across multiple GPUs without changing your model code. Here I’ll look at another way that an experiment can benefit from being trained on multiple GPUs. Determined makes it easy for data scientists and ML engineers to apply advanced functionality such as automatic model tuning with hyperparameter search, also known as Hyperparameter Optimization (HPO), to accelerate the hyperparameter search for their model with minimal effort. Determined’s HPO uses a Searcher algorithm like Random, Grid, Adaptive, or PBT, and ranges of hyperparameters that are specified in the experiment configuration file.
In general, data scientists try several learning algorithms with a variety of hyperparameters on the same dataset by launching several training processes. They do this in order to determine the model that works best for the business problem they try to address. Determined’s HPO automates this process for you. Determined finds the best-performing model by running many training tasks (trials) on the same dataset and code for the deep learning model. Determined launches the trials simultaneously on different GPUs. Each trial uses a different configuration of hyperparameters randomly chosen by the Searcher from the range of values specified in the experiment configuration file. Determined then chooses the hyperparameter values that result in a model that performs the best, as measured by the validation metric that is also defined in the experiment configuration file.
Below is the experiment configuration file (adaptive.yaml) I’ll use to launch the HPO experiment in Determined. As you can see, the set of user-defined hyperparameters range and the state-of-the-art searcher method Adaptive ASHA are now defined. In the Searcher section, the parameter max trials indicates the number of trials that the experiment will create and how many model configurations to explore. The validation metric and the amount of data on which to train the model are the same as for my previous experiments. Each trial runs on one GPU because the resource parameter slots per trial is not specified here, therefore the default setting of a single GPU per trial is used by Determined.
Note: The
Adaptive ASHAsearcher method works best with many hundreds of trials. For the purpose of my experimental use case, I set the maximum number of trials to 6.
name: iris_adaptivesearch
hyperparameters: # Hyperparameters specified as ranges
  learning_rate:
    type: log
    minval: -5.0
    maxval: 1.0
    base: 10.0
  learning_rate_decay: 1.0e-6
  layer1_dense_size:
   type: int
  minval: 4
  maxval: 32
global_batch_size:
  type: int
  minval: 5
  maxval: 30
searcher:
  name: adaptive_asha # The HPO Searcher algorithm
  metric: val_categorical_accuracy
  smaller_is_better: false
  max_length:
    batches: 5000
max_trials: 6 # Number of trials to launch for the HPO experiment
entrypoint: model_def:IrisTrial
bind_mounts:
  - host_path: /opt/bluedata/mapr/mnt/<DataFabric-clusterName>/exthcp/tenant-<ID>/fsmount/repo/data
  container_path: /opt/bluedata/mapr/mnt/<DataFabric-clusterName>/exthcp/tenant-<ID>/fsmount/repo/data
  read_only: true
I then launch the experiment using the CLI command:
det experiment create adaptive.yaml <model-definition-directory>
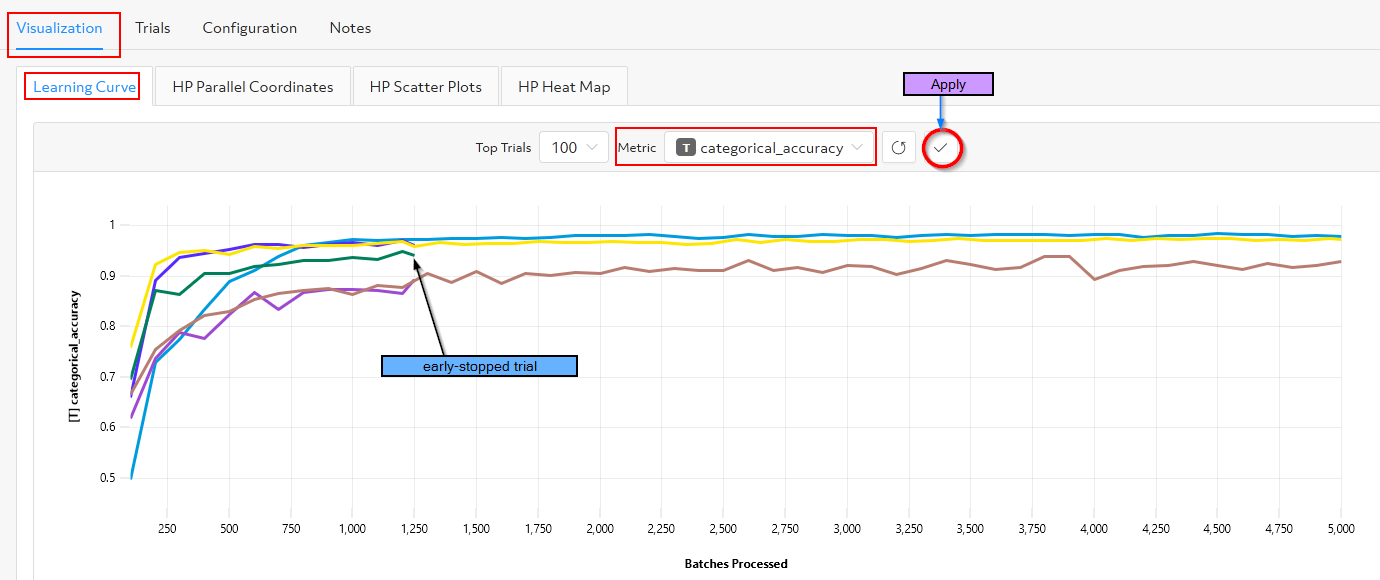
Similar to the other experiments, I navigate to the WebUI to monitor the progress of the training tasks and access information on both training and validation performance for the trials of the experiment. As shown in the figure below, Determined’s hyperparameter search functionality provides several visualization options (Learning Curve, Parallel Plot, Scatter Plot, Heat Map) for analyzing results.
As the experiment runs, I select the training metric categorical accuracy in the Learning Curve tab to visualize the model accuracy on training data for each trial over the number of completed batches. I can see that the Searcher’s early stopping capability has stopped poor-performing trials that do not require any extra training. Determined releases valuable GPU resources on trials that will never produce the best model.
When the Determined experiment is complete, I can navigate to the Trials tab of the WebUI and compare the results of different trials. I can then see which hyperparameters yield the best model which will enable me to perform better future experiments by further tuning the hyperparameters. You can also use the CLI commands below to get the best trial and its hyperparameters values:
#
# Get the best trial for my experiment.
# The output gives me the trial ID.
#
det experiment list-checkpoints --best 1 <MyExperiment-Id>
#
# Get a description of the best trial discover
# Discover the hyperparameters values for this best model
#
det trial describe <Trial-Id>
I can then use the same Determined Python API code I used earlier to load and test the best model and make inferences.
Summary
During both parts of this blog series, I wore a couple of hats: IT operations hat and Data Scientist/ML engineer hat.
While wearing my IT operations hat, I deployed Determined on a Kubernetes cluster running on HPE Ezmeral Runtime Enterprise which provided all of the components needed to run Determined: a workload scheduler such as Kubernetes, a namespace, multi-tenancy, an ingress gateway, persistent storage for experiments tracking, and a shared file system for storing model artifacts and datasets.
With my Data Scientist/ML engineer hat, I used Determined and its interfaces (CLI and the Web User Interface) to get started with fundamental Determined concepts and train a simple Iris classification neural network model using multiple GPUs with distributed training and state-of-the-art hyperparameter search. I also used Determined’s Python API to load and test the trained model and to make inferences.
The Iris classification example used in this post is relatively simple. In a real-world use case, you would likely use Determined to build and train more complex deep learning models with much larger datasets. You would also likely be using a larger compute infrastructure with plenty of GPUs available to parallelize training models across data science teams.
I hope these blog posts have properly equipped you as you get started with Determined. I was able to write this two-part blog series by joining and receiving help from the Determined Community Slack, which you can do by following this link. You can begin training models with Determined today by visiting the Determined project on GitHub.
This post originally appeared on the HPE Dev Blog and has been slightly modified from the original author’s work.